
Free English NOMA 052-8867-6 (01) PDF document. Download the PDF, use the online viewer, or browse the FAQs for easy troubleshooting.
CLICK HERE TO DOWNLOAD NOMA 052-8867-6 (01) PDF DOCUMENT
If this is not the document you want for this product, click here to see if we have any other documents for this product.
What are the functions of the buttons on the NOMA 052-8867-6 timer?
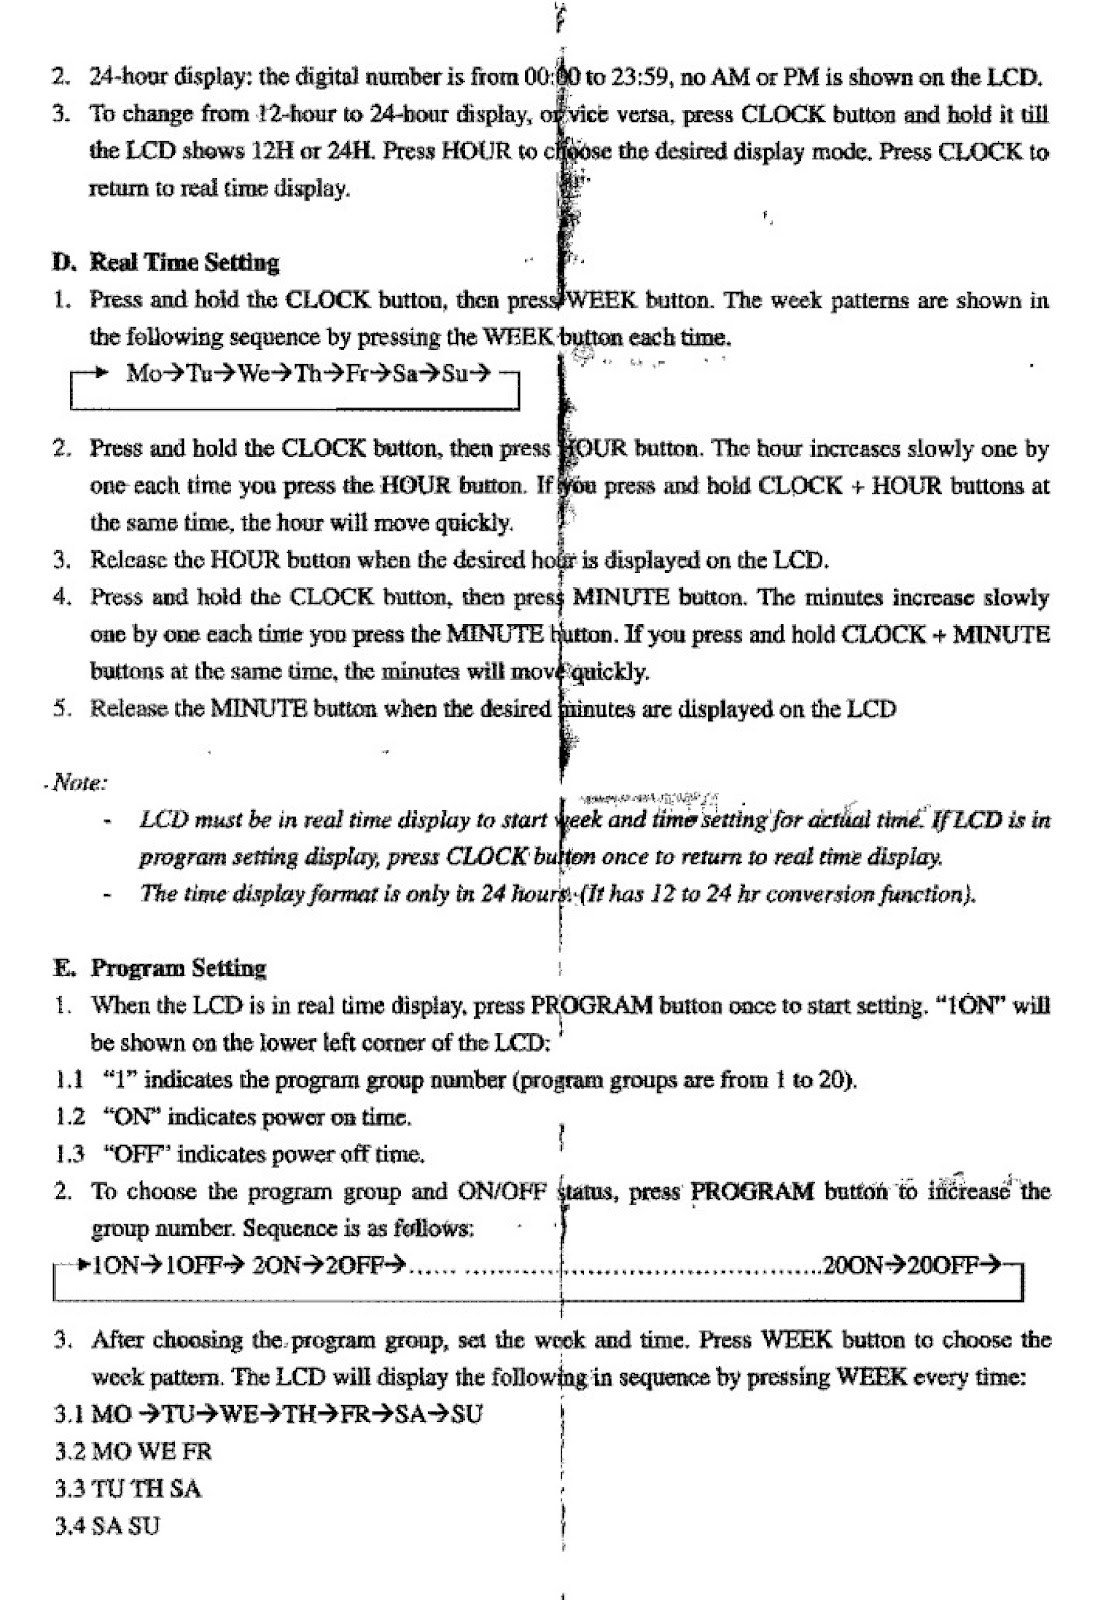
| No. | Button | Description | Functions |
|---|---|---|---|
| 1 | LCD Display | Shows time and program setting. | |
| 2 | W/S: Week | -In program setting mode, press to set week pattern. -In real time setting, press CLOCK + WEEK to set date of week. |
|
| 3 | RST/RCL | (Recessed button with circular arrow icon) | Cancel or resume the power ON/OFF set time under Program setting. |
| 4 | R | (Recessed button) | Press and hold to reset all the programs permanently. |
| 5 | CLOCK | (Clock icon) | – Return to real time display when in program setting. – Press CLOCK + WEEK/HOUR/MINUTE to set real time. |
| 6 | ON/OFF | (Power icon) | Change the setting mode to ON, AUTO, or OFF. When pressing the button each time, the horizontal line in the LCD moves to ON -> AUTO -> OFF, which is printed on the Timer housing. |
| 7 | P: PROGRAM | Press to enter program setting. | |
| 8 | H: HOUR | -In program setting mode, press to set hour. -In real time setting, press CLOCK + HOUR to set hour. |
|
| 9 | M: MINUTE | -In program setting mode, press to set minute. -In real time setting, press CLOCK + MINUTE to set minute. |
How do I switch between 12-hour and 24-hour time display on the NOMA 052-8867-6 timer?
To change from 12-hour to 24-hour display, or vice versa, press the CLOCK button and hold it until the LCD shows 12H or 24H. Press the HOUR button to choose the desired display mode. Press CLOCK to return to the real time display.
12-hour display: The digital number is from 11:59 to 12:00 with AM or PM shown on the LCD.
24-hour display: The digital number is from 00:00 to 23:59, no AM or PM is shown on the LCD.
How do I set the current time and day on the NOMA 052-8867-6 timer?
Note: The LCD must be in real time display to start week and time setting. If the LCD is in the program setting display, press the CLOCK button once to return to the real time display.
1. Press and hold the CLOCK button, then press the WEEK button. The week patterns are shown in the following sequence by pressing the WEEK button each time: Mo -> Tu -> We -> Th -> Fr -> Sa -> Su.
2. Press and hold the CLOCK button, then press the HOUR button. The hour increases slowly one by one each time you press the HOUR button. If you press and hold CLOCK + HOUR buttons at the same time, the hour will move quickly.
3. Release the HOUR button when the desired hour is displayed on the LCD.
4. Press and hold the CLOCK button, then press the MINUTE button. The minutes increase slowly one by one each time you press the MINUTE button. If you press and hold CLOCK + MINUTE buttons at the same time, the minutes will move quickly.
5. Release the MINUTE button when the desired minutes are displayed on the LCD.
How do I set an ON/OFF program on my NOMA 052-8867-6 timer?
1. When the LCD is in real time display, press the PROGRAM button once to start setting. “1ON” will be shown on the lower left corner of the LCD. “1” indicates the program group number (from 1 to 20), and “ON” indicates the power on time.
2. To choose the program group and ON/OFF status, press the PROGRAM button to increase the group number. The sequence is as follows: 1ON -> 1OFF -> 2ON -> 2OFF -> … -> 20ON -> 20OFF.
3. After choosing the program group, set the week pattern. Press the WEEK button to choose the desired pattern. The LCD will display the following patterns in sequence:
• MO TU WE TH FR SA SU
• MO WE FR
• TU TH SA
• SA SU
• MO TU WE
• TH FR SA
• MO TU WE TH FR
• MO TU WE TH FR SA
• MO TU WE TH FR SA SU
4. Then, set the on/off time for the preset program.
5. Press HOUR to set the number of hours.
6. Press MINUTE to set the minutes.
7. To set other program group’s on/off time, repeat procedures #2 to #7.
How do I change or reset a preset program on the NOMA 052-8867-6 timer?
To change a preset program, repeat the program setting procedures and input the new data to replace the old setting. Alternatively, you can press the RST/RCL button once to reset the program. Press the same button again to recall the original setting.
After program setting, press the CLOCK button to return to the clock display at once, or it will be returned automatically after 15 seconds without pressing any other buttons.
How do I override or resume the preset program on my NOMA 052-8867-6 timer?
Pressing the ON/OFF button each time can override or resume the preset program. The LCD changes the display in the following sequence:
1. ON: Overrides the preset program and the appliance remains on.
2. AUTO: Resumes the preset program. The appliance will be turned on and off automatically according to the preset time.
3. OFF: Overrides the preset program and the appliance remains off.
How do I connect an appliance to the NOMA 052-8867-6 timer?
1. Preset your desired On/Off programs on the Timer as mentioned above.
2. Switch off your electrical appliance.
3. Connect your appliance’s power cord to the Timer’s socket, then connect the Timer to the AC socket to get power.
4. Switch on your appliance.
5. The appliance will then be turned ON/OFF according to your preset programs unless a manual override is pressed.
What should I do if my NOMA 052-8867-6 timer does not power up immediately?
This timer features an internal rechargeable battery. If it does not power up immediately when plugged in, leave it in the outlet for 2-5 minutes to allow the battery to charge.
What are the safety precautions for the NOMA 052-8867-6 timer?
1. This Timer is for indoor use only. DO NOT USE OUTDOORS.
2. An appliance is to be plugged into the Timer and must not exceed the ratings found in “Specifications”.
3. The Timer uses a rechargeable battery. To power the unit back on, press the reset button while plugged into an outlet.
What are the technical specifications of the NOMA 052-8867-6 timer?
1. 125VAC 60Hz 5A/625W Resistive
2. 125VAC 60Hz 4.8A/600W Tungsten
3. Time Setting Interval: 1 Minute
CAUTION: Load must not exceed rated capacity.
How to use the PDF below:
* Touchscreen: Swipe up/down with-in the PDF to scroll and pinch or spread with two fingers to zoom.
* Mouse: While your mouse is hovering over the PDF, use the mouse wheel to scroll and click on the – / + buttons at the bottom of the PDF to zoom.
CLICK HERE TO DOWNLOAD NOMA 052-8867-6 (01) PDF DOCUMENT
Guys,
With the #0528867-6 timer, my current time is correct and my program time is correct i.e 16:30 On and 23:00 Off…Wondering why my on time comes on exactly at 16:30 but my off time goes off at 23:02 instead of 23:00…Not the end of the world but how can that happen?…
The PDF does not offer a clear explanation for why your timer turns off at 23:02 instead of 23:00, but they do provide some potential insights:
The timer’s setting interval is 1 minute. This means the timer can only be programmed in increments of 1 minute. Therefore, it’s unlikely that the discrepancy is due to a setting error.
The timer has a random setting security feature. This feature can turn the plugged-in device on 2-30 minutes after the preset ON time and turn it off 2-30 minutes after the preset OFF time. If this feature is activated, it could explain why the timer turns off later than expected. Check your timer’s display for the “RND” indicator to see if this feature is enabled.
The timer has an internal rechargeable battery. While the battery is designed to maintain accurate timekeeping even when unplugged, it’s possible that a battery issue could be causing a slight delay in the off time. Trying a reset, as described in the PDF may potentially resolve this.
The documentation mentions potential issues with the timer not powering up immediately when plugged in and recommends leaving it plugged in for 2-5 minutes to allow the battery to charge. Although this refers to the initial power-up, it hints at the battery potentially affecting the timer’s functionality.
The PDF also highlight the importance of reviewing all timer settings to ensure there are no unintended settings that could be interfering with the desired off time.