
Free English PANASONIC SD-BT55P (01) PDF document. Download the PDF, use the online viewer, or browse the FAQs for easy troubleshooting.
CLICK HERE TO DOWNLOAD PANASONIC SD-BT55P (01) PDF DOCUMENT
If this is not the document you want for this product, click here to see if we have any other documents for this product.
What are the important safeguards for the PANASONIC SD-BT55P bread maker?
When using your PANASONIC SD-BT55P, basic safety precautions should always be followed:
1. READ ALL INSTRUCTIONS BEFORE USE.
2. Follow all warnings and instructions marked on the product.
3. Unplug this product from the wall outlet when not in use and before cleaning. Do not immerse the appliance in water or other liquid. Use a soft sponge and mild detergent when cleaning the inside of the pan or kneading blade. The cabinet may be cleaned with a cloth, dampened with a mild soap and water solution.
4. Do not touch hot surfaces. Use mittens when handling hot materials, and allow metal parts to cool before cleaning.
5. Close supervision is necessary when any appliance is used near children.
6. Do not allow anything to rest on the power cord. Do not plug in the cord where persons may walk or trip.
7. Do not operate any appliance with a damaged or frayed cord. Refer servicing of the appliance to an authorized service center if the unit should malfunction or be damaged in any manner.
8. This appliance is not intended for commercial use.
9. The use of attachments not recommended by the manufacturer may cause damage or injury.
10. Avoid contacting moving parts.
11. Do not use outdoors. Do not use the appliance for other than its intended use.
12. Do not let the cord hang over the edge of a table or counter, or touch hot surfaces.
13. Do not place on or near a hot gas or electric burner, or in a heated oven.
14. To disconnect, grip the plug and pull it from the wall outlet. Never pull on the cord.
What should I know about the power cord and using an extension cord with the PANASONIC SD-BT55P?
A. A short power-supply cord is provided to reduce the risk resulting from becoming entangled in or tripping over a longer cord.
B. Extension cords are available and may be used if care is exercised in their use.
C. If an extension cord is used:
(1) The marked electrical rating of the extension cord should be at least as great as the electrical rating of the appliance.
(2) The longer cord should be arranged so that it will not drape over the countertop or tabletop where it can be pulled on by children or tripped over unintentionally.
What are the different bread modes on the PANASONIC SD-BT55P?
The PANASONIC SD-BT55P offers two main bread modes:
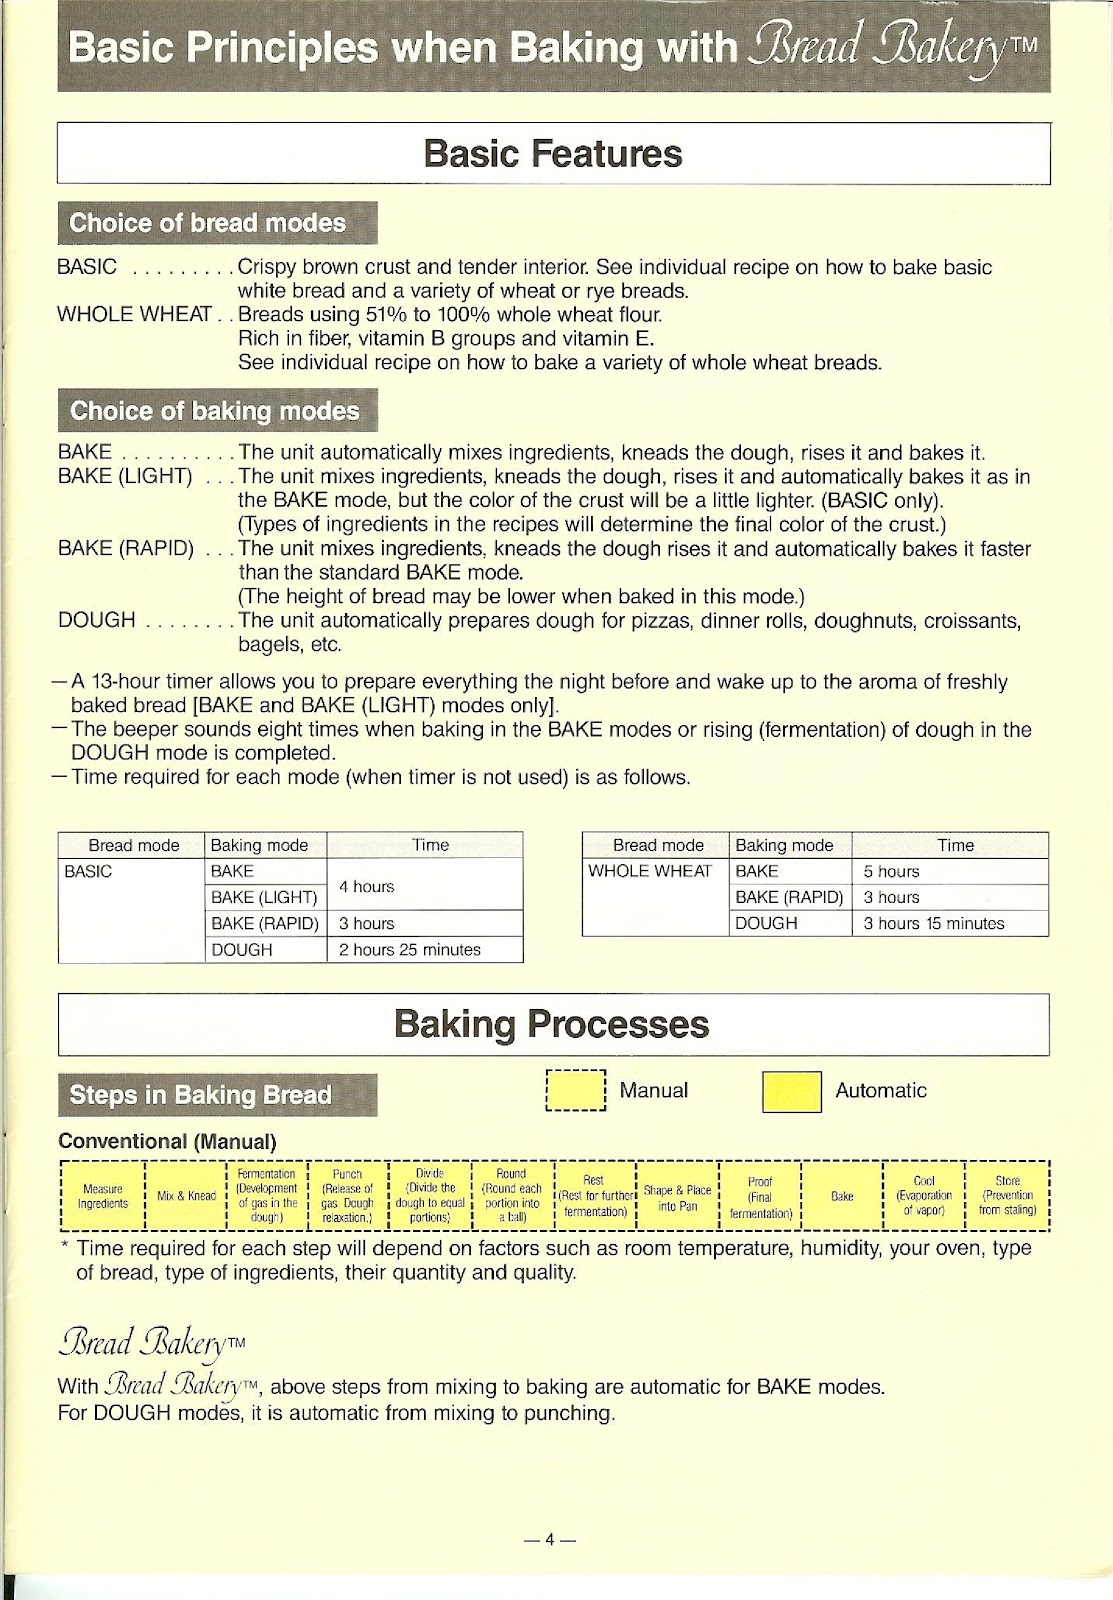
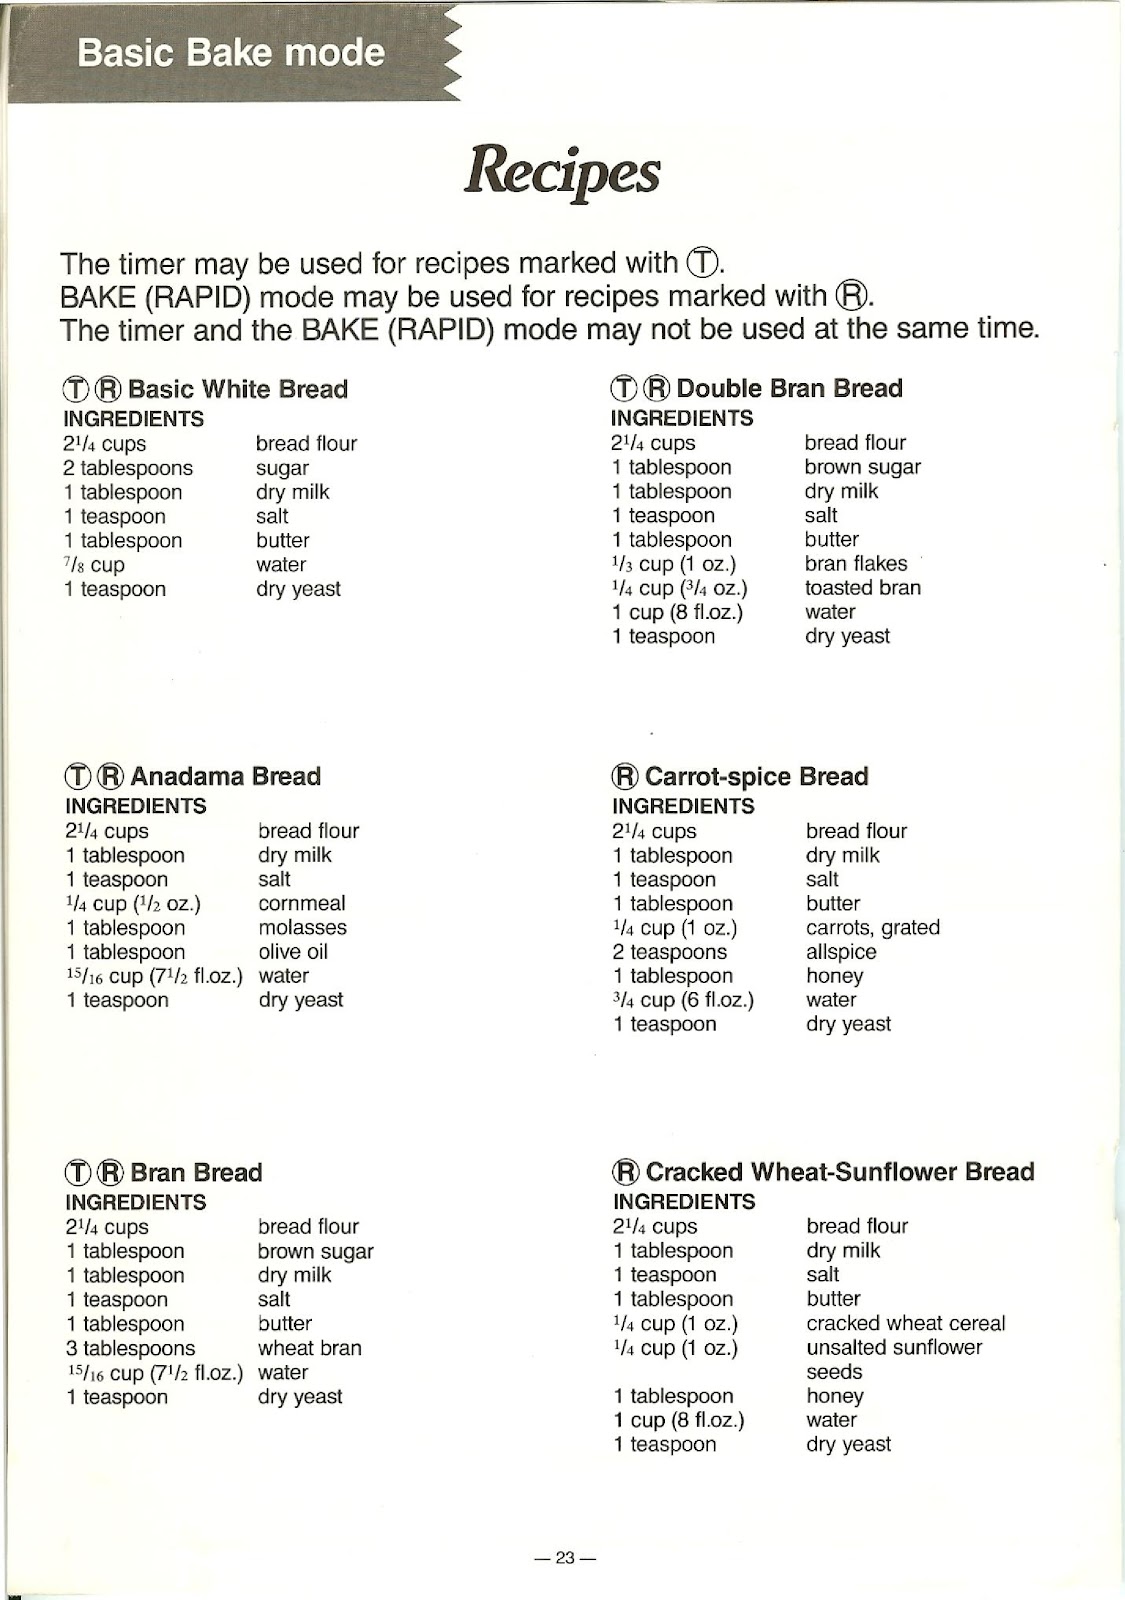
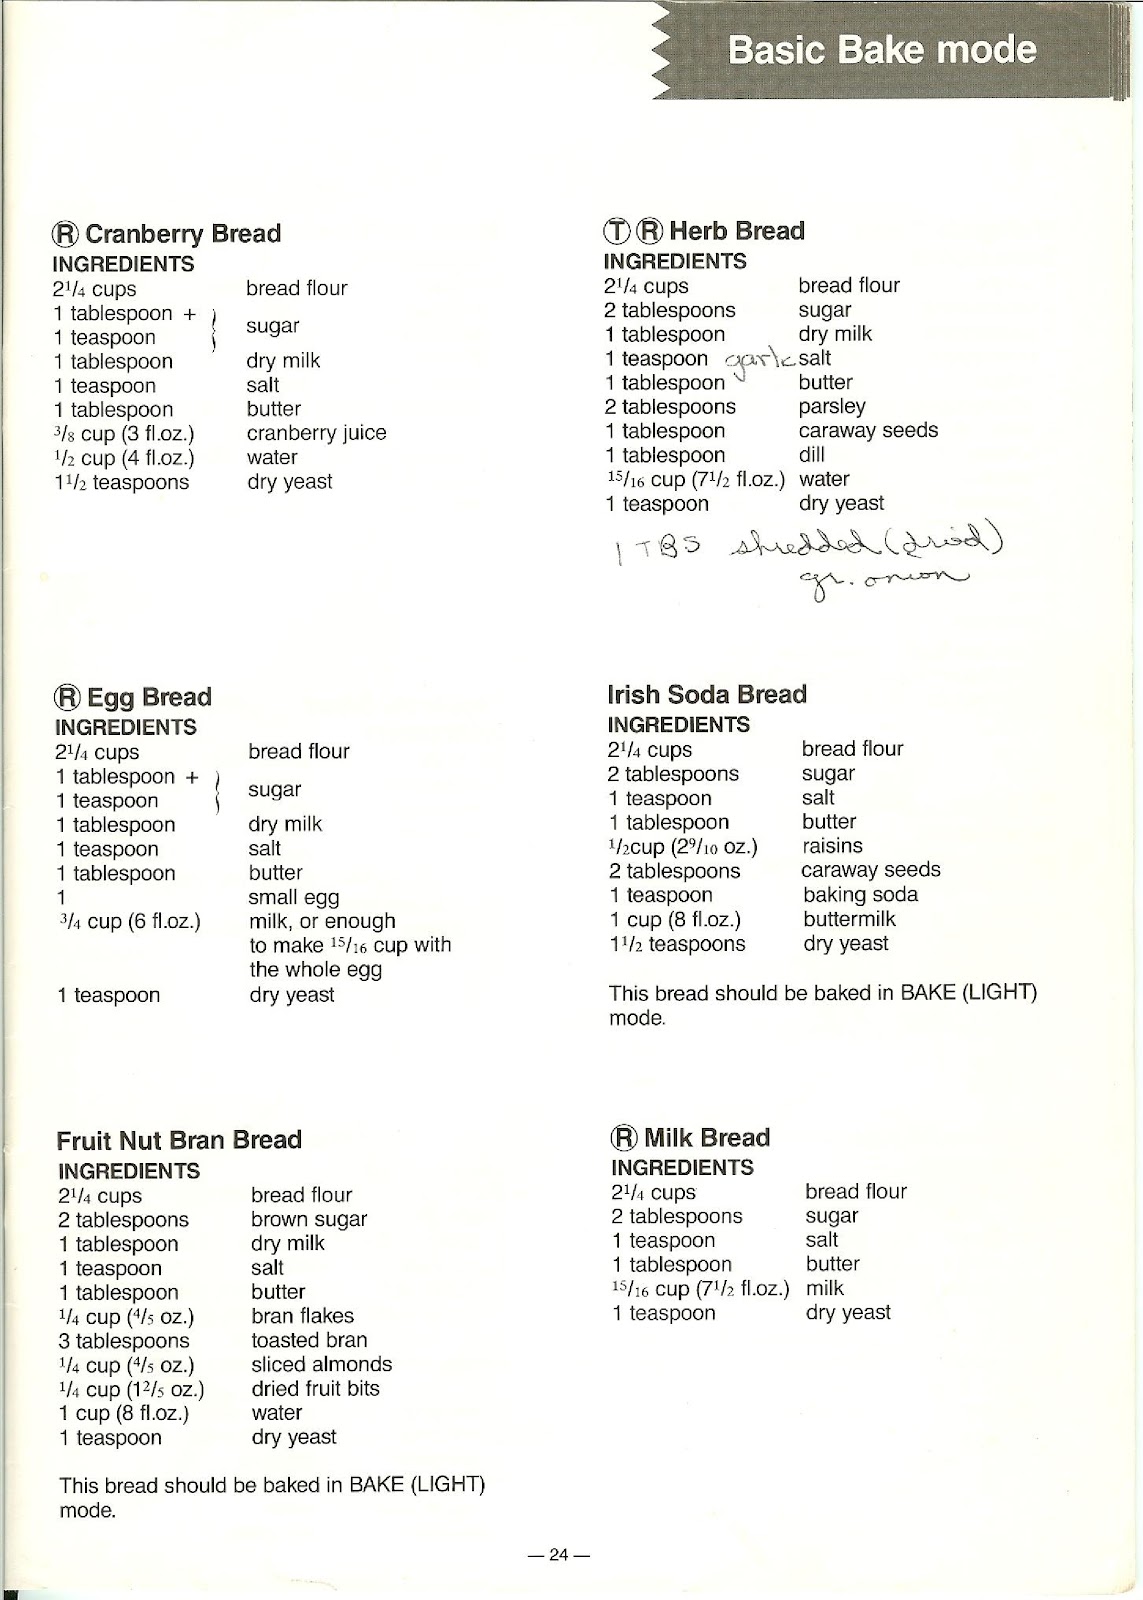
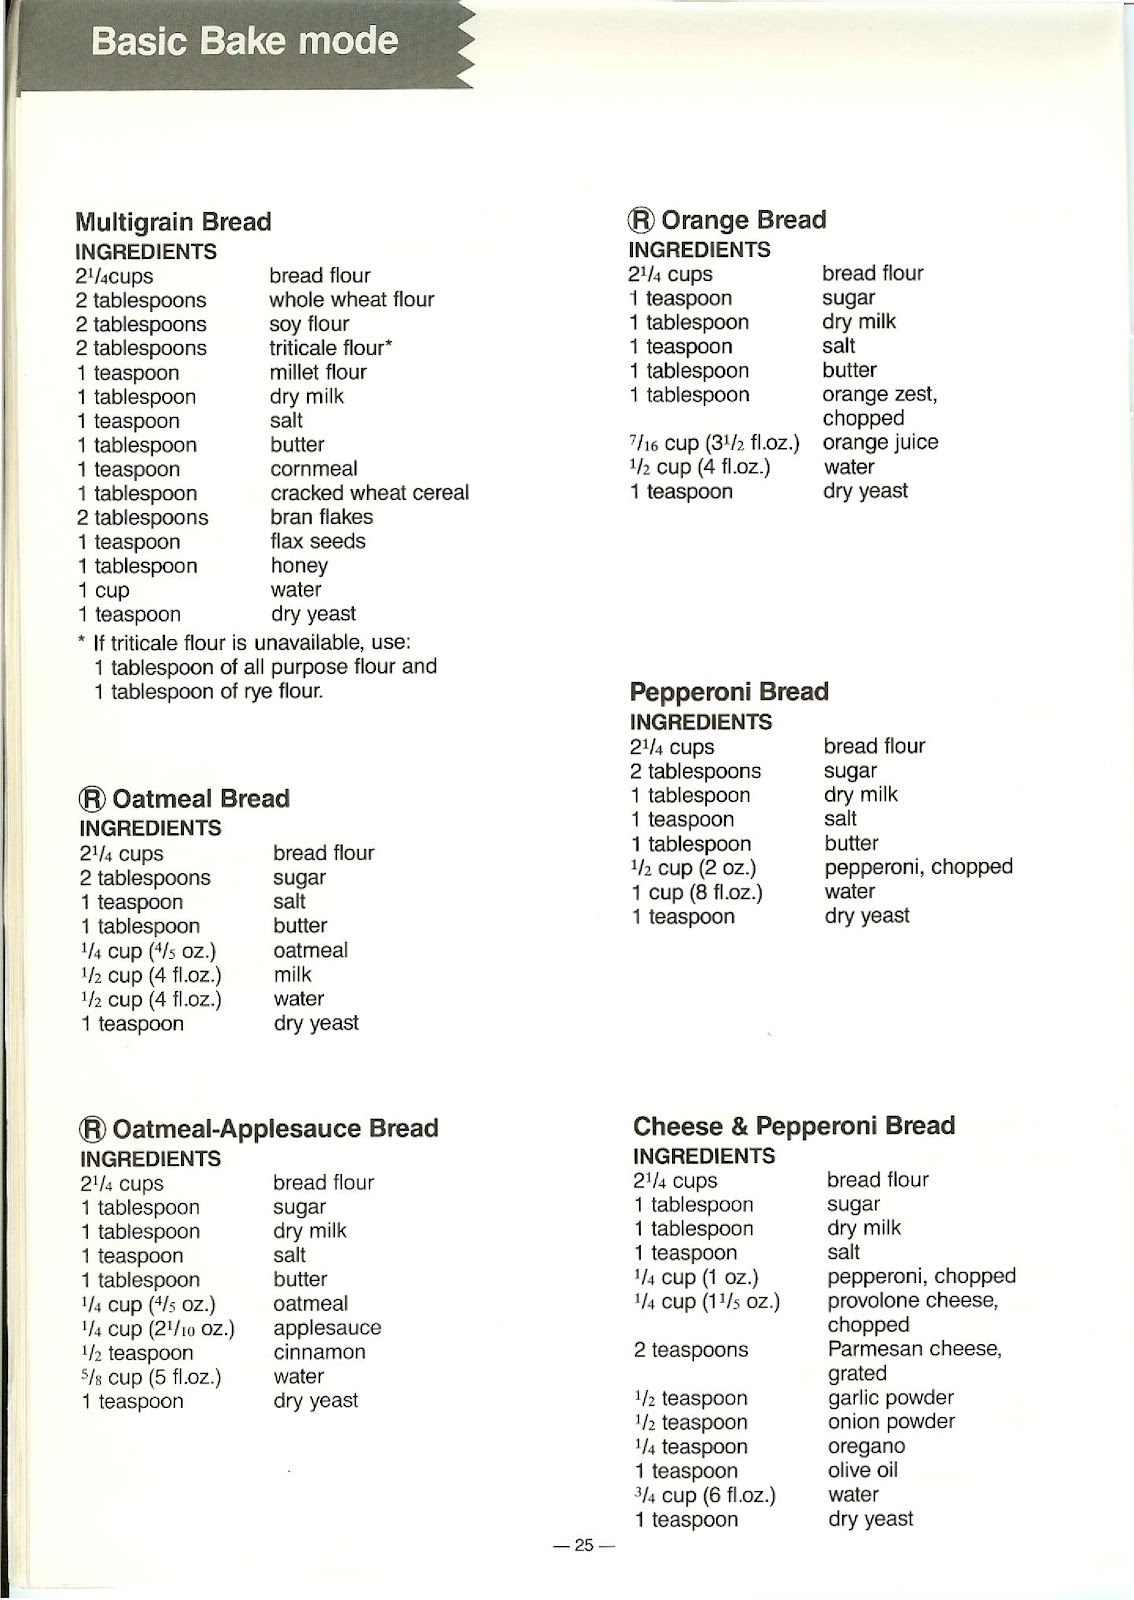
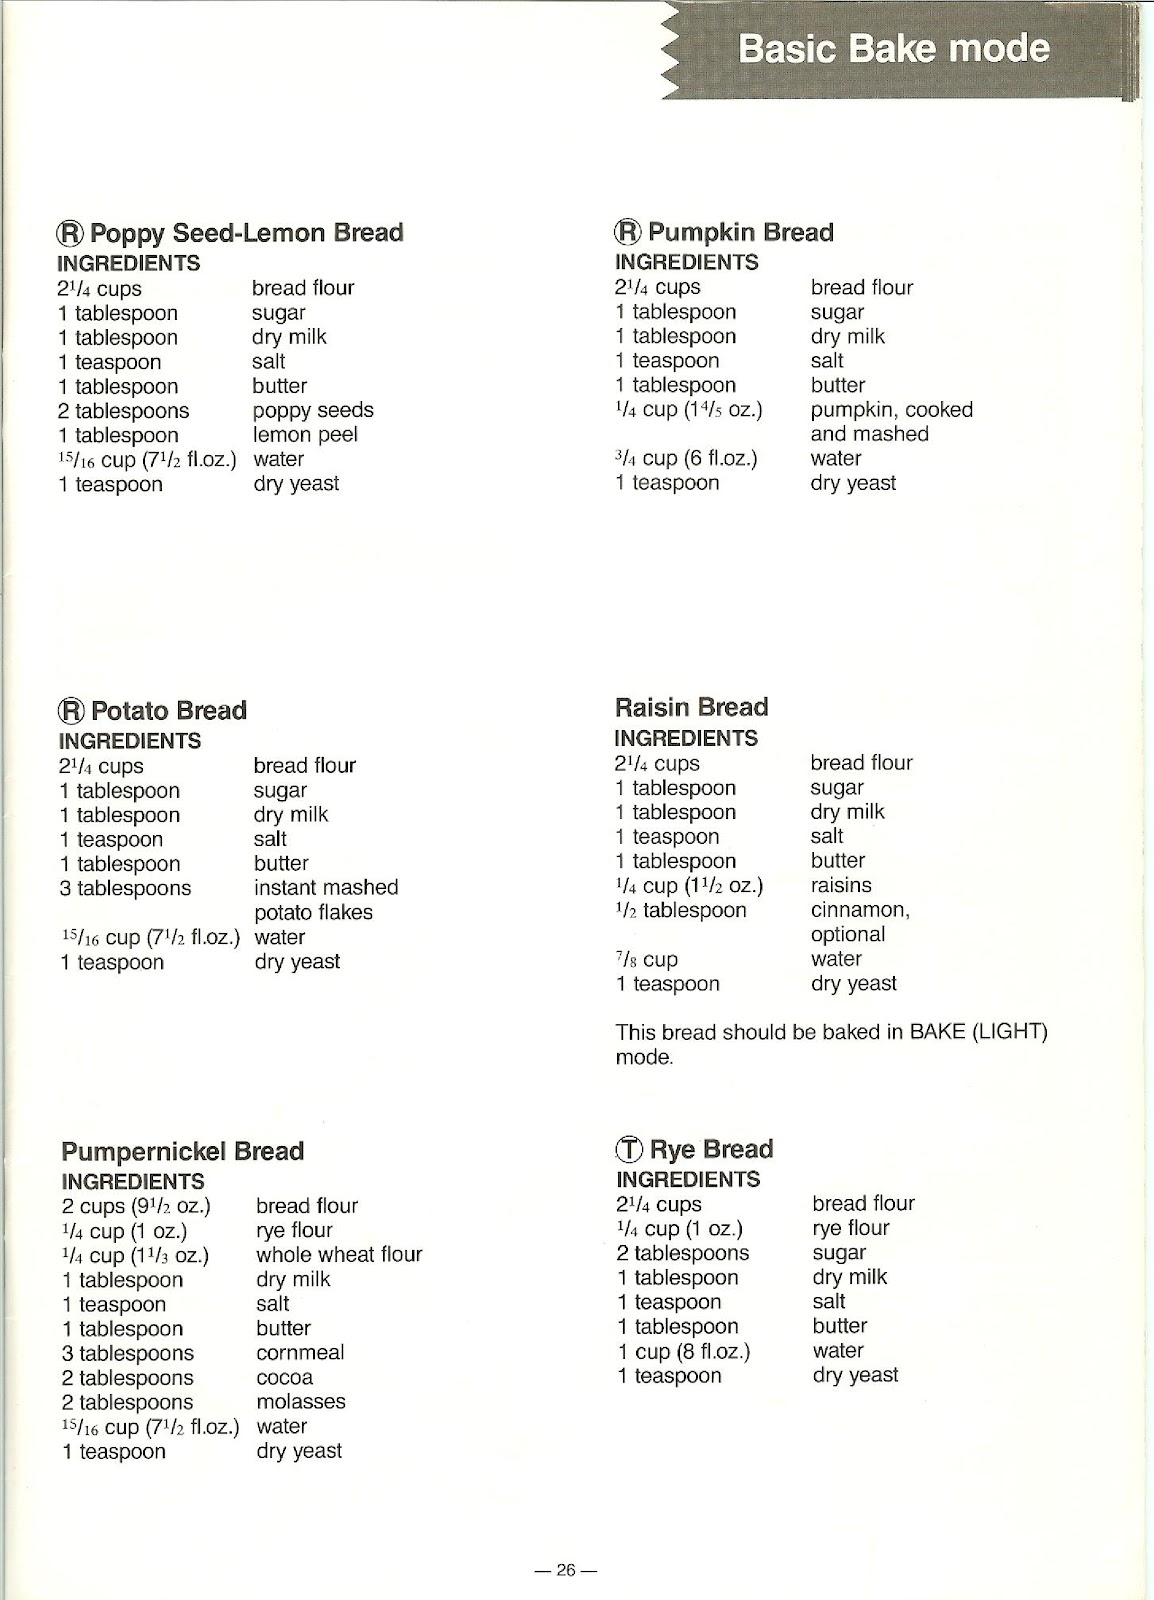
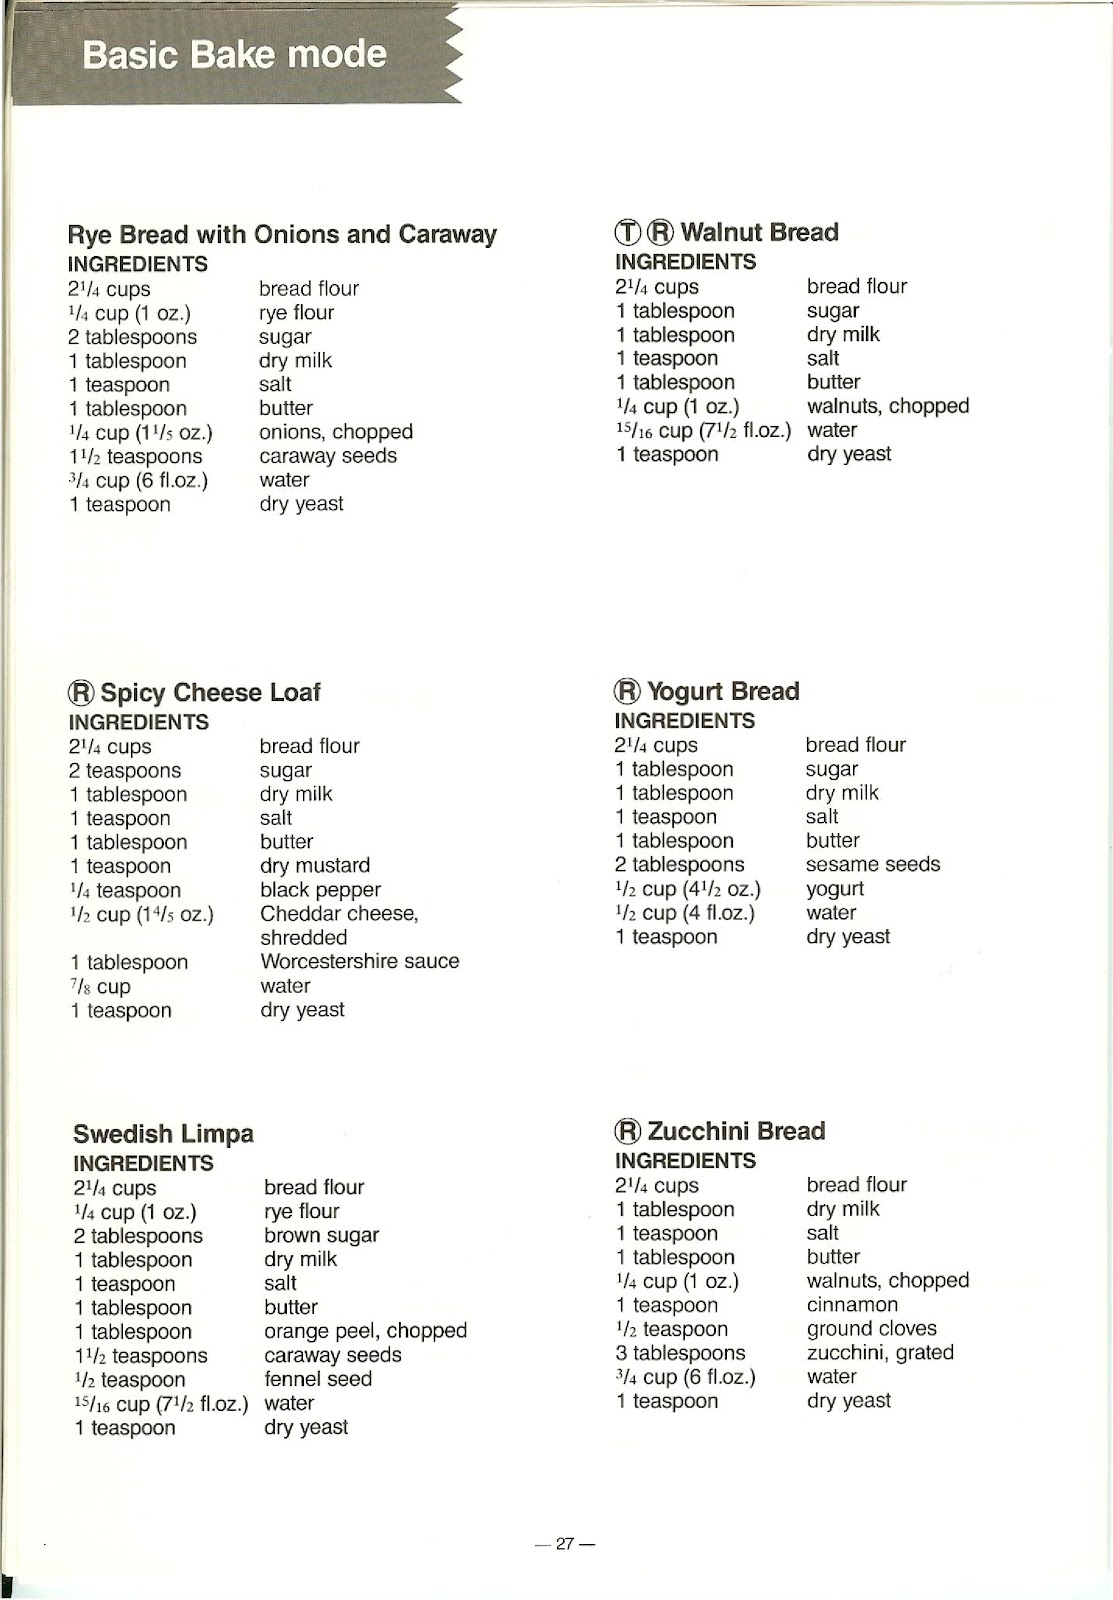
BASIC: For breads with a crispy brown crust and tender interior. This mode is used for basic white bread and a variety of wheat or rye breads.
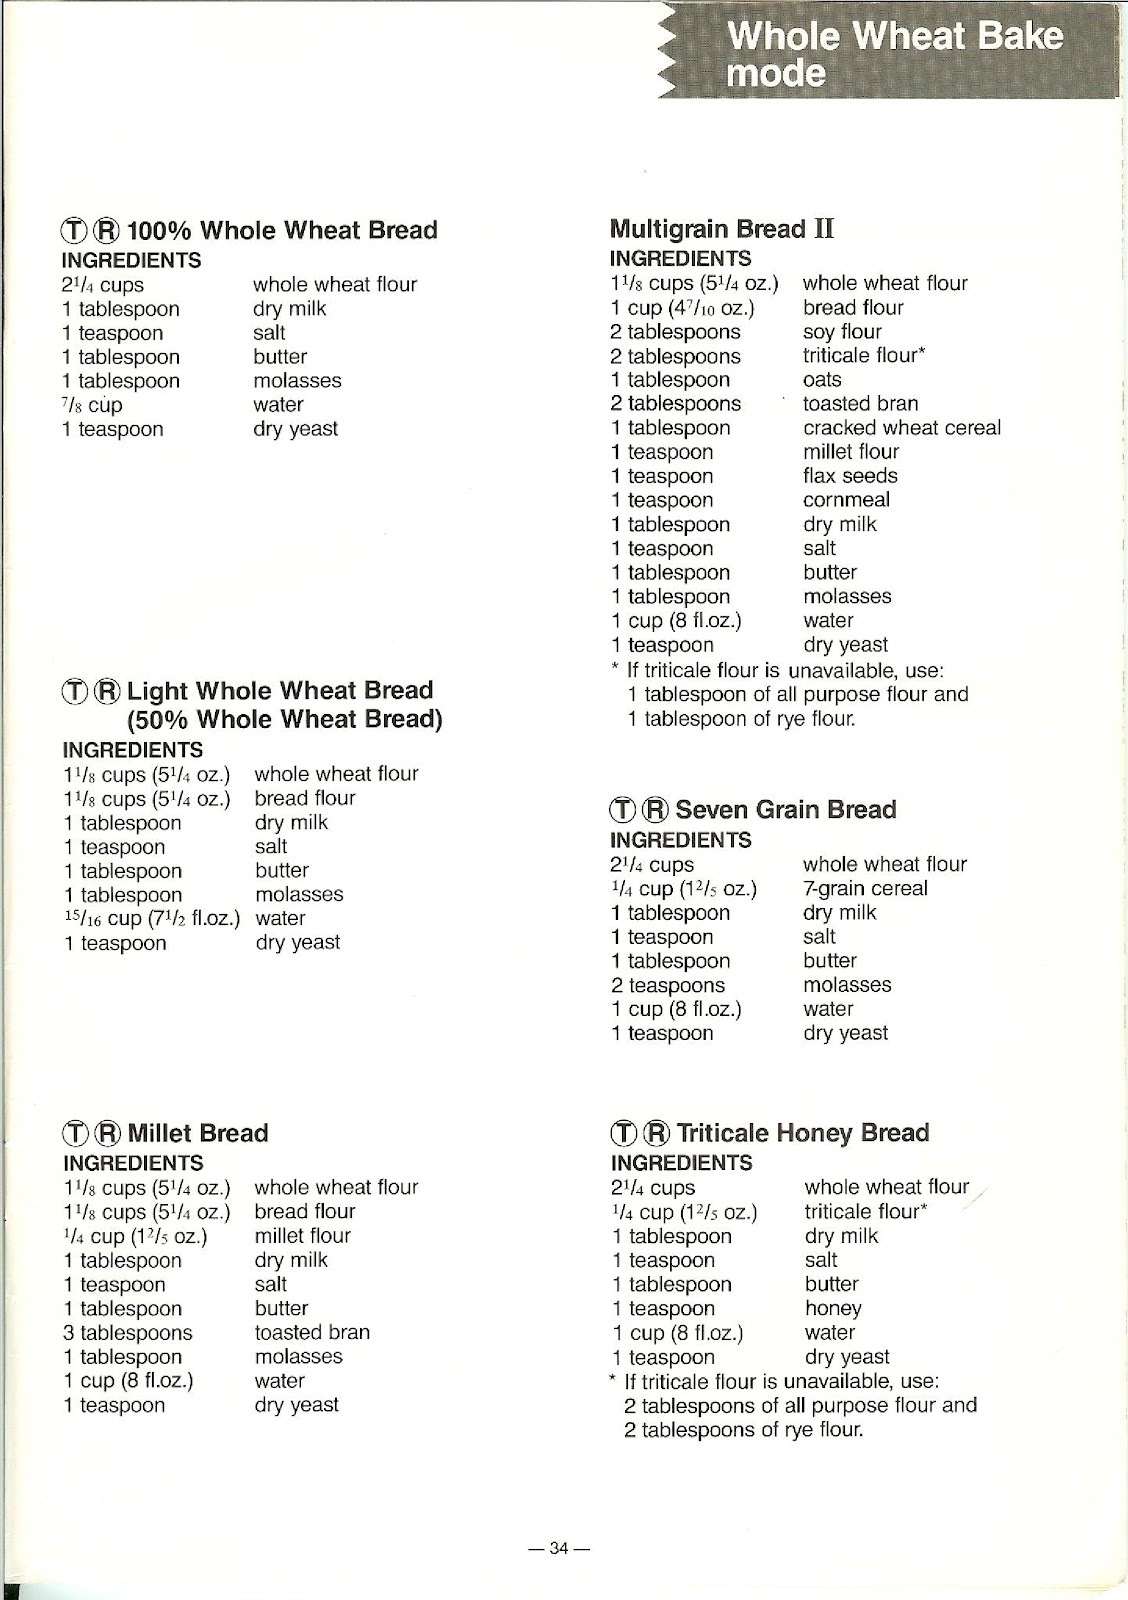
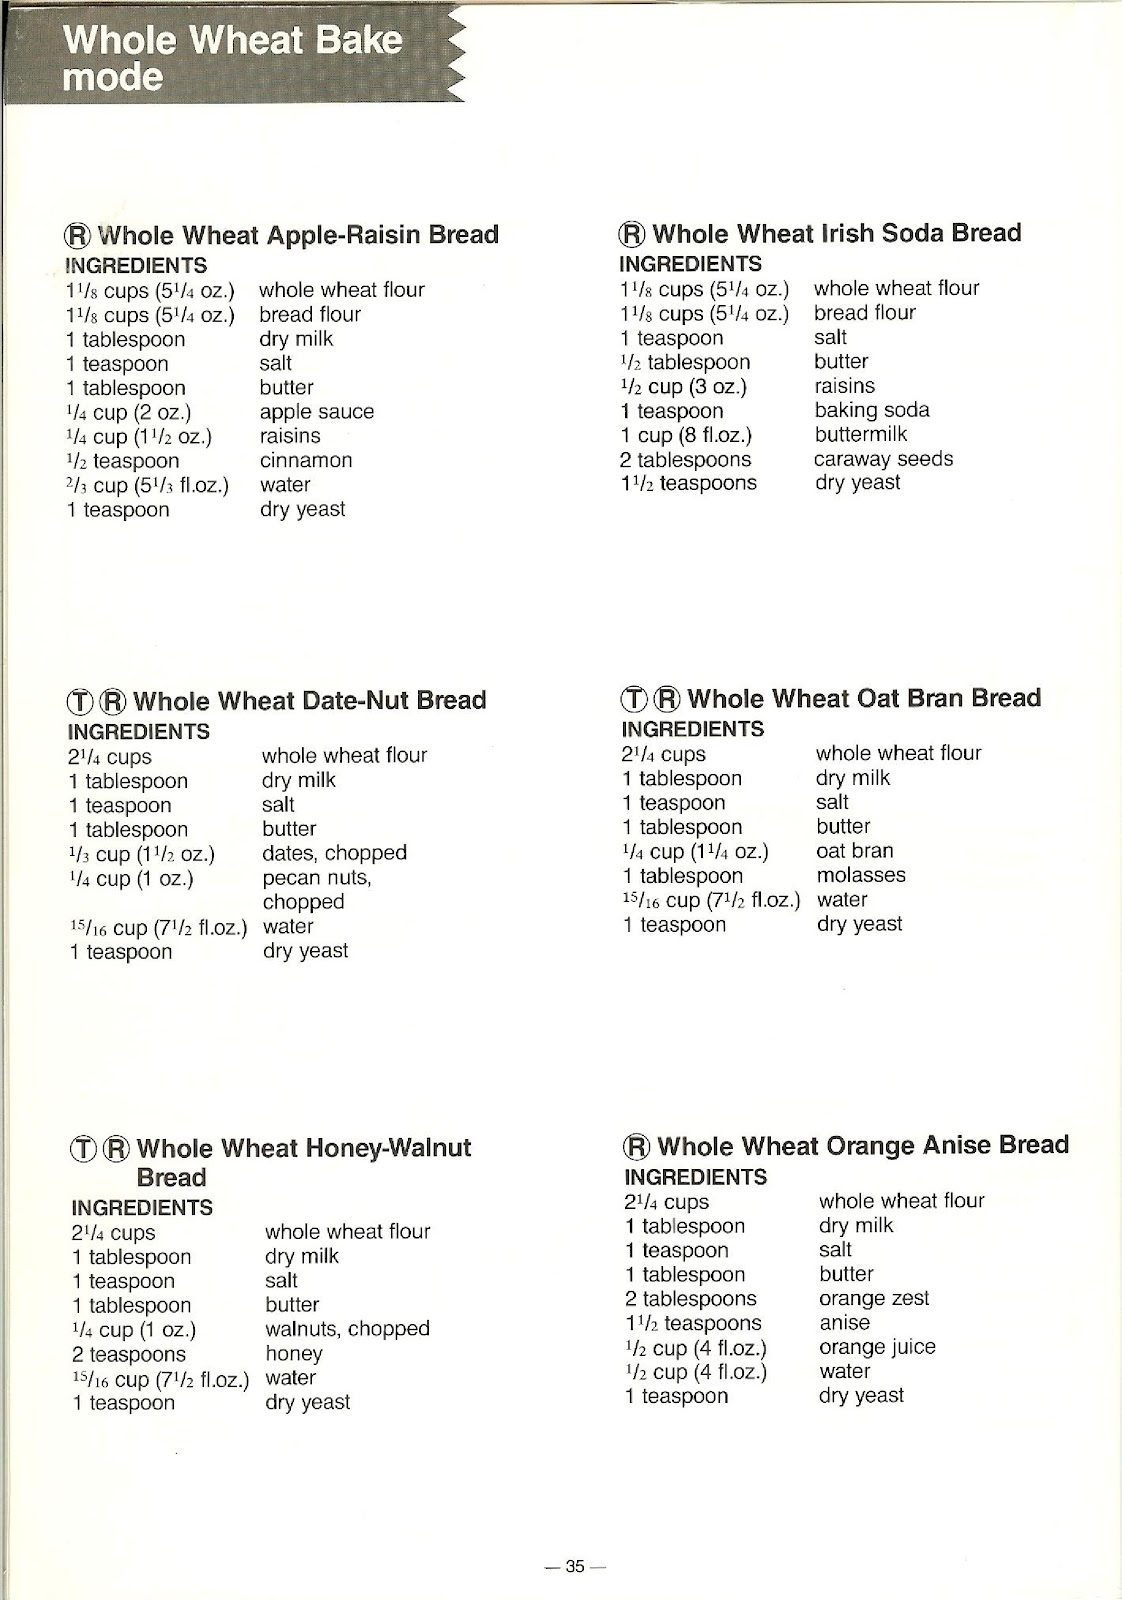
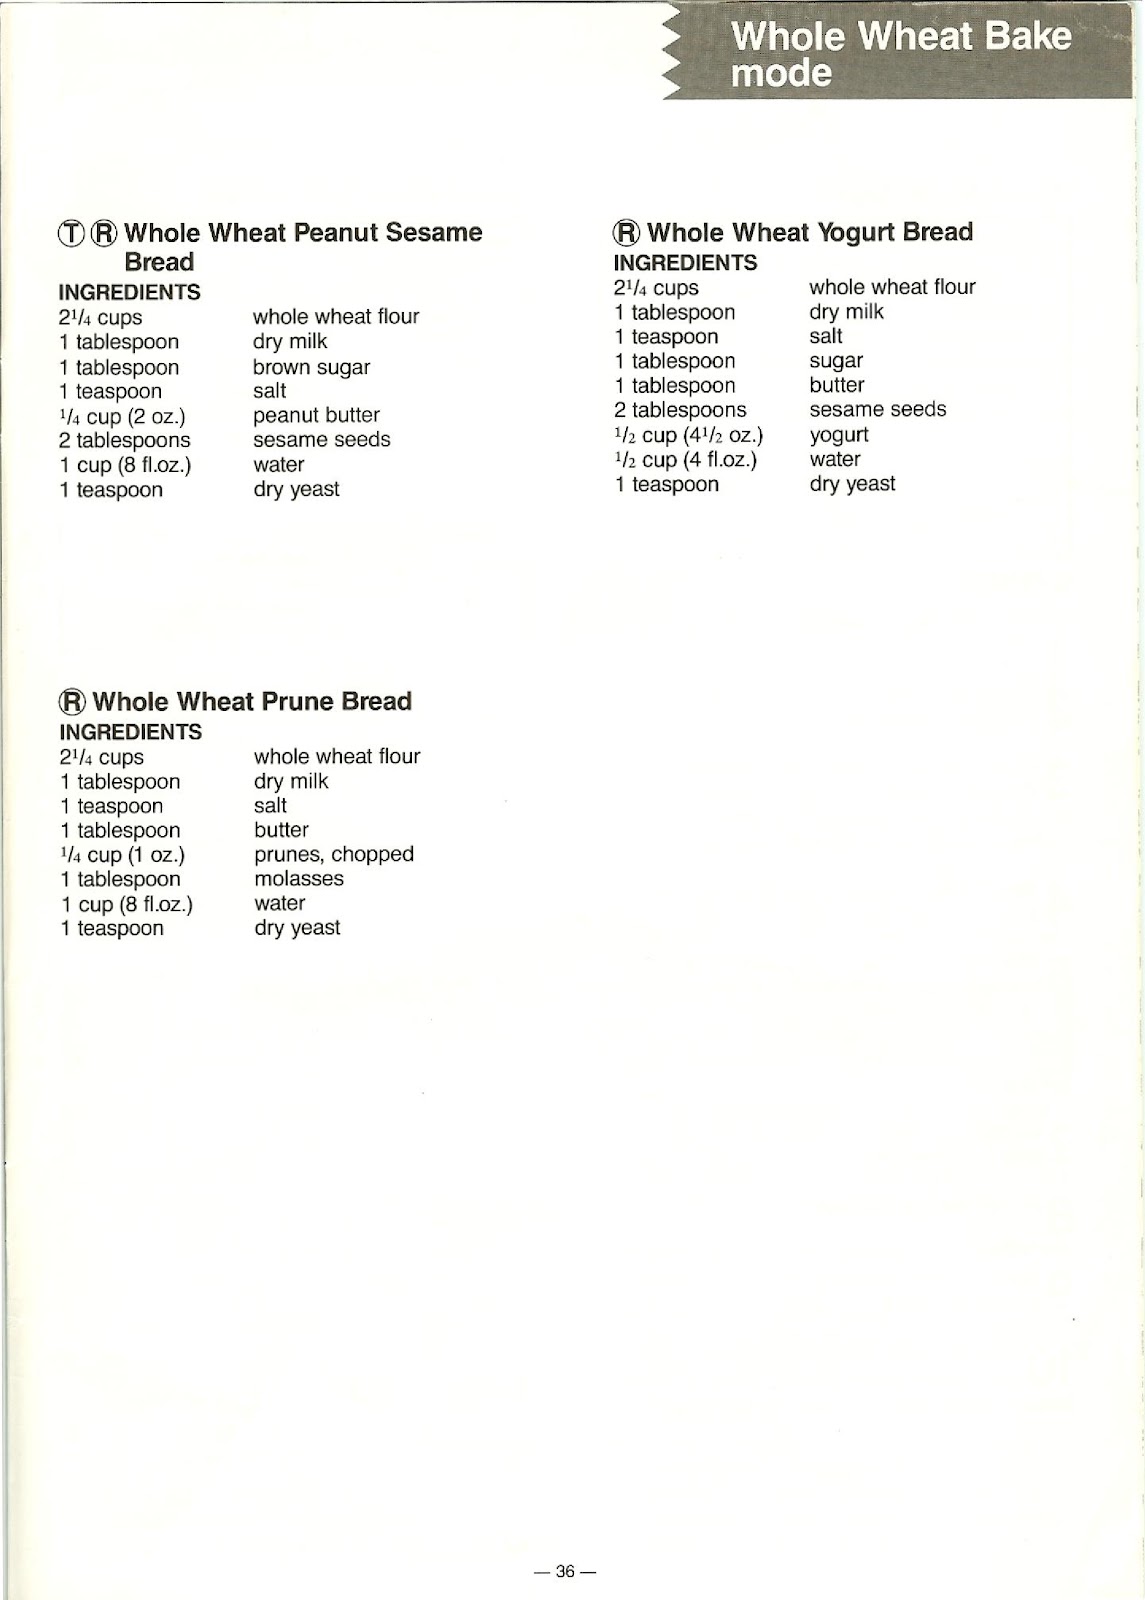
WHOLE WHEAT: For breads using 51% to 100% whole wheat flour. These breads are rich in fiber, vitamin B groups, and vitamin E.
What are the different baking modes available on the PANASONIC SD-BT55P?
You can choose from the following baking modes:
BAKE: The unit automatically mixes ingredients, kneads the dough, lets it rise, and bakes it.
BAKE (LIGHT): This mode works like the standard BAKE mode, but the crust color will be a little lighter. This mode is for BASIC bread only.
BAKE (RAPID): The unit mixes, kneads, rises, and bakes the dough faster than the standard BAKE mode. The height of the bread may be lower when baked in this mode.
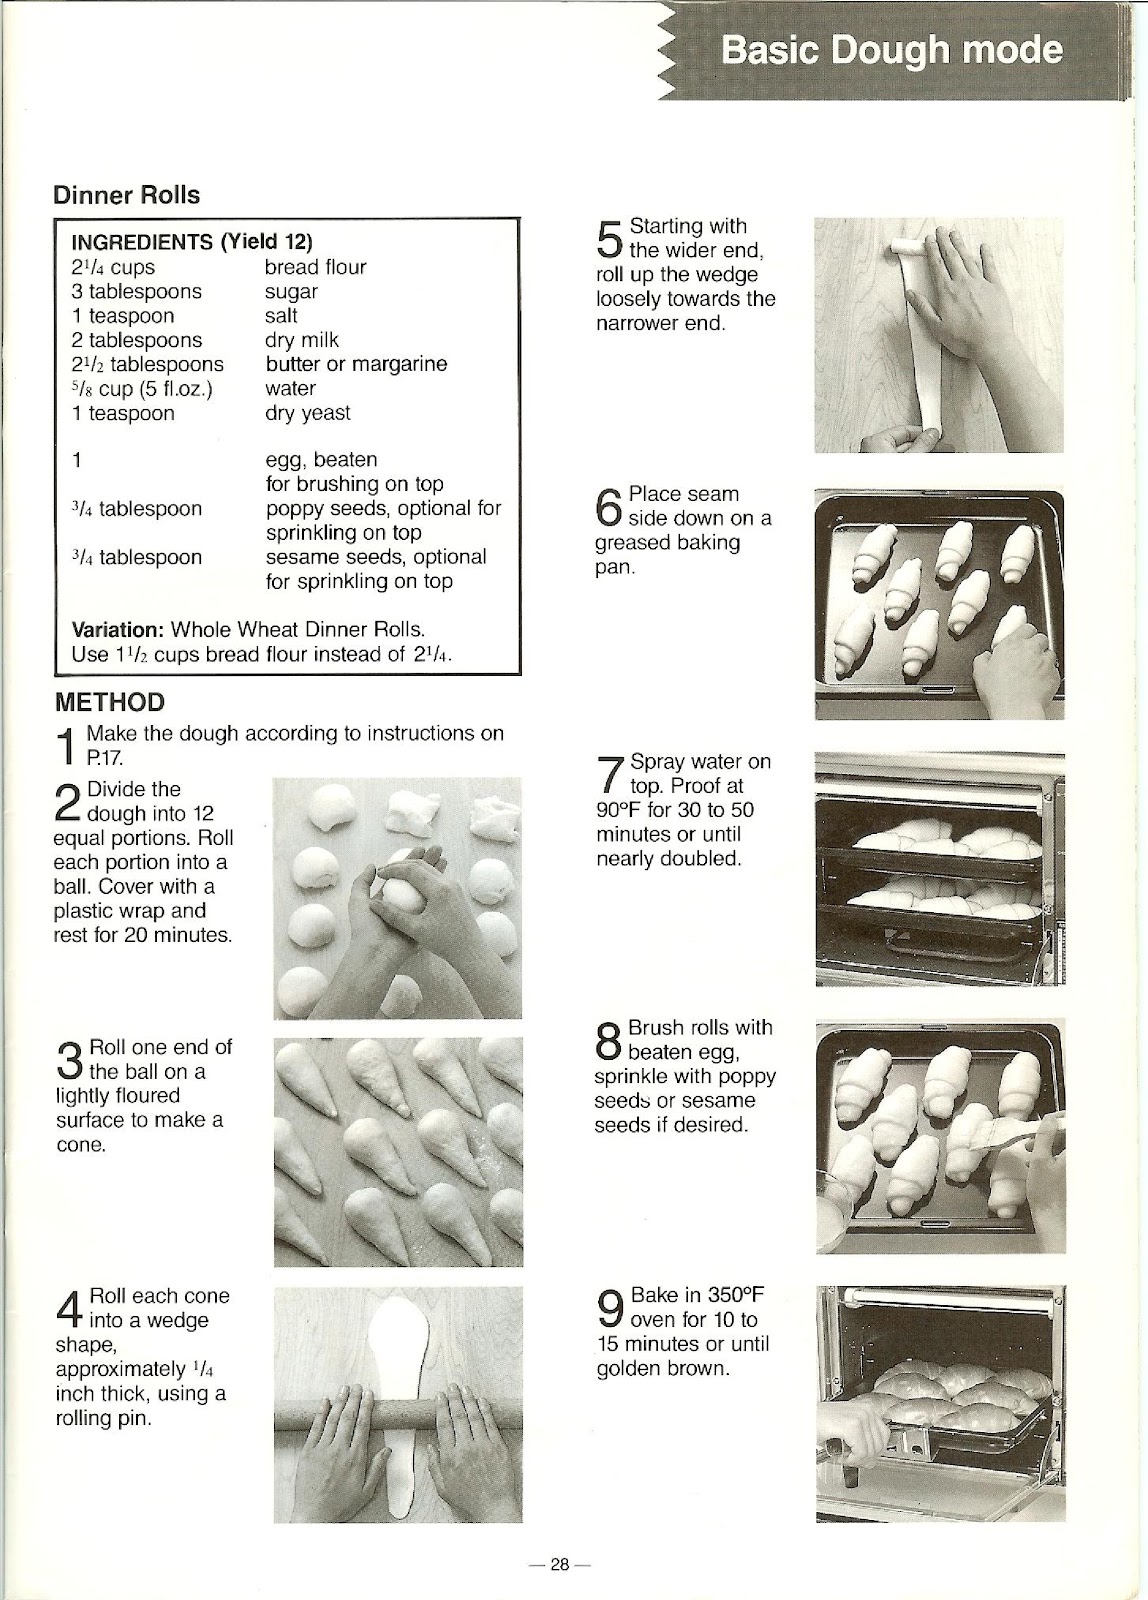
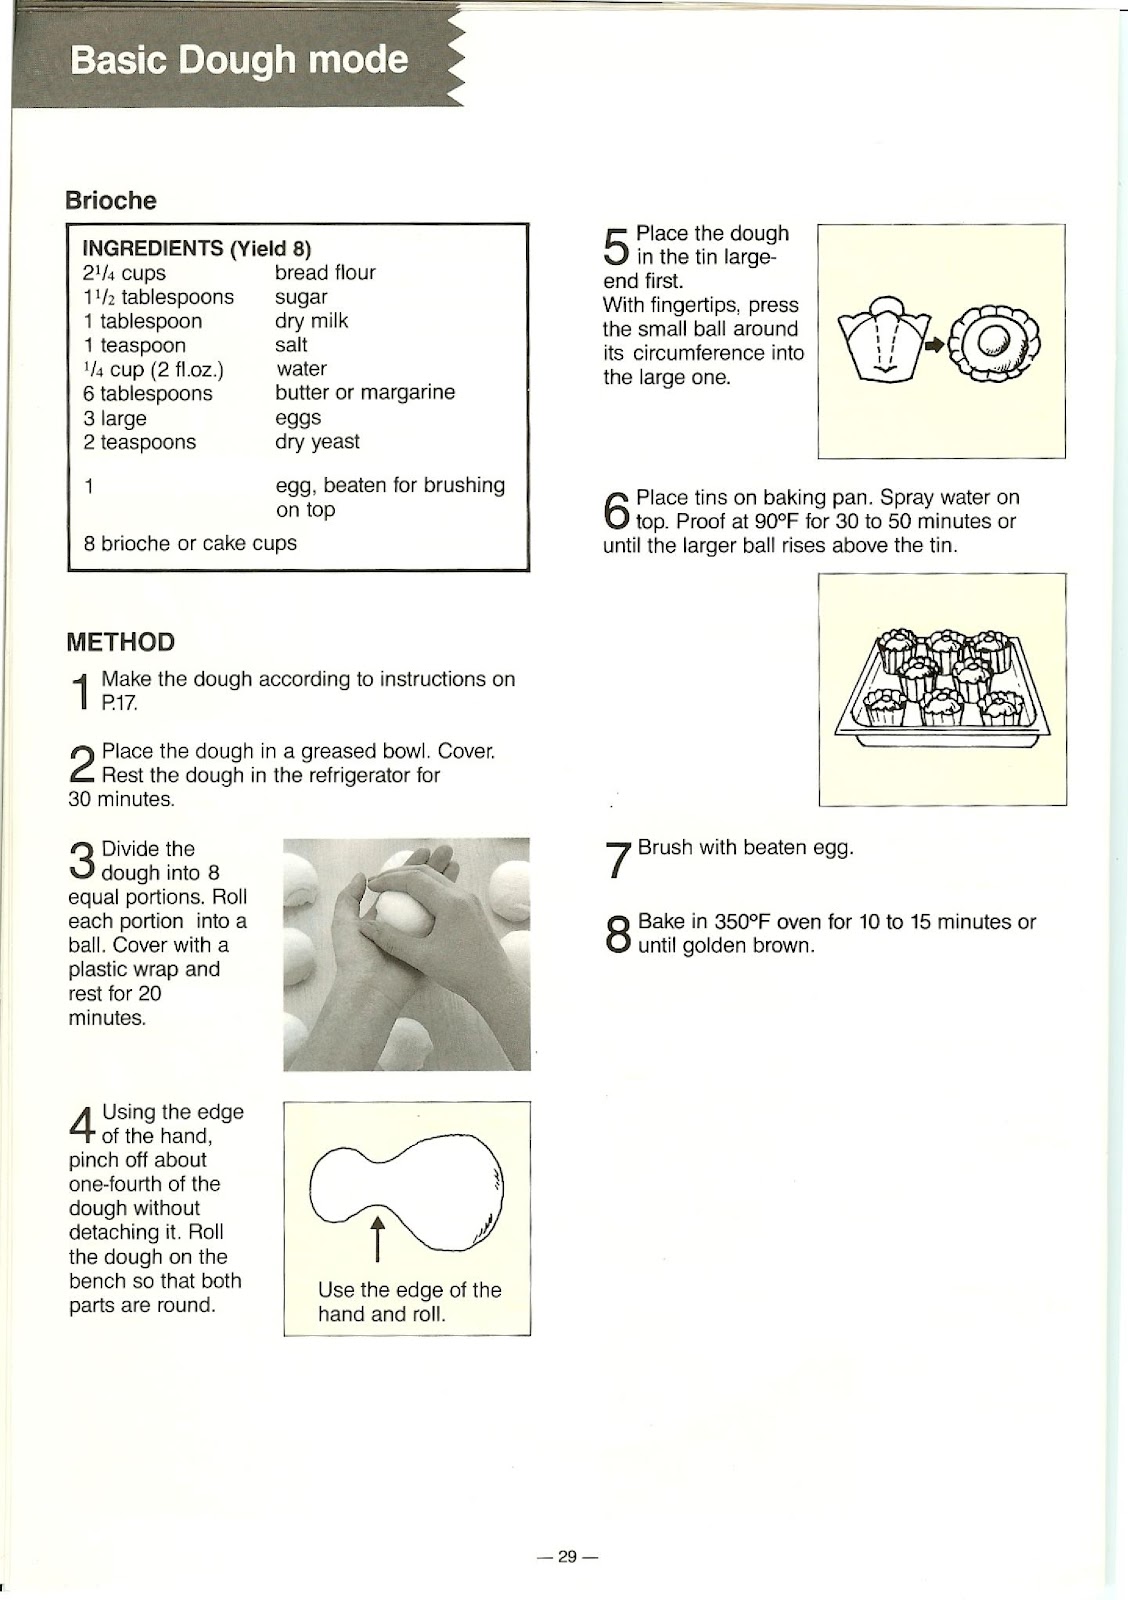
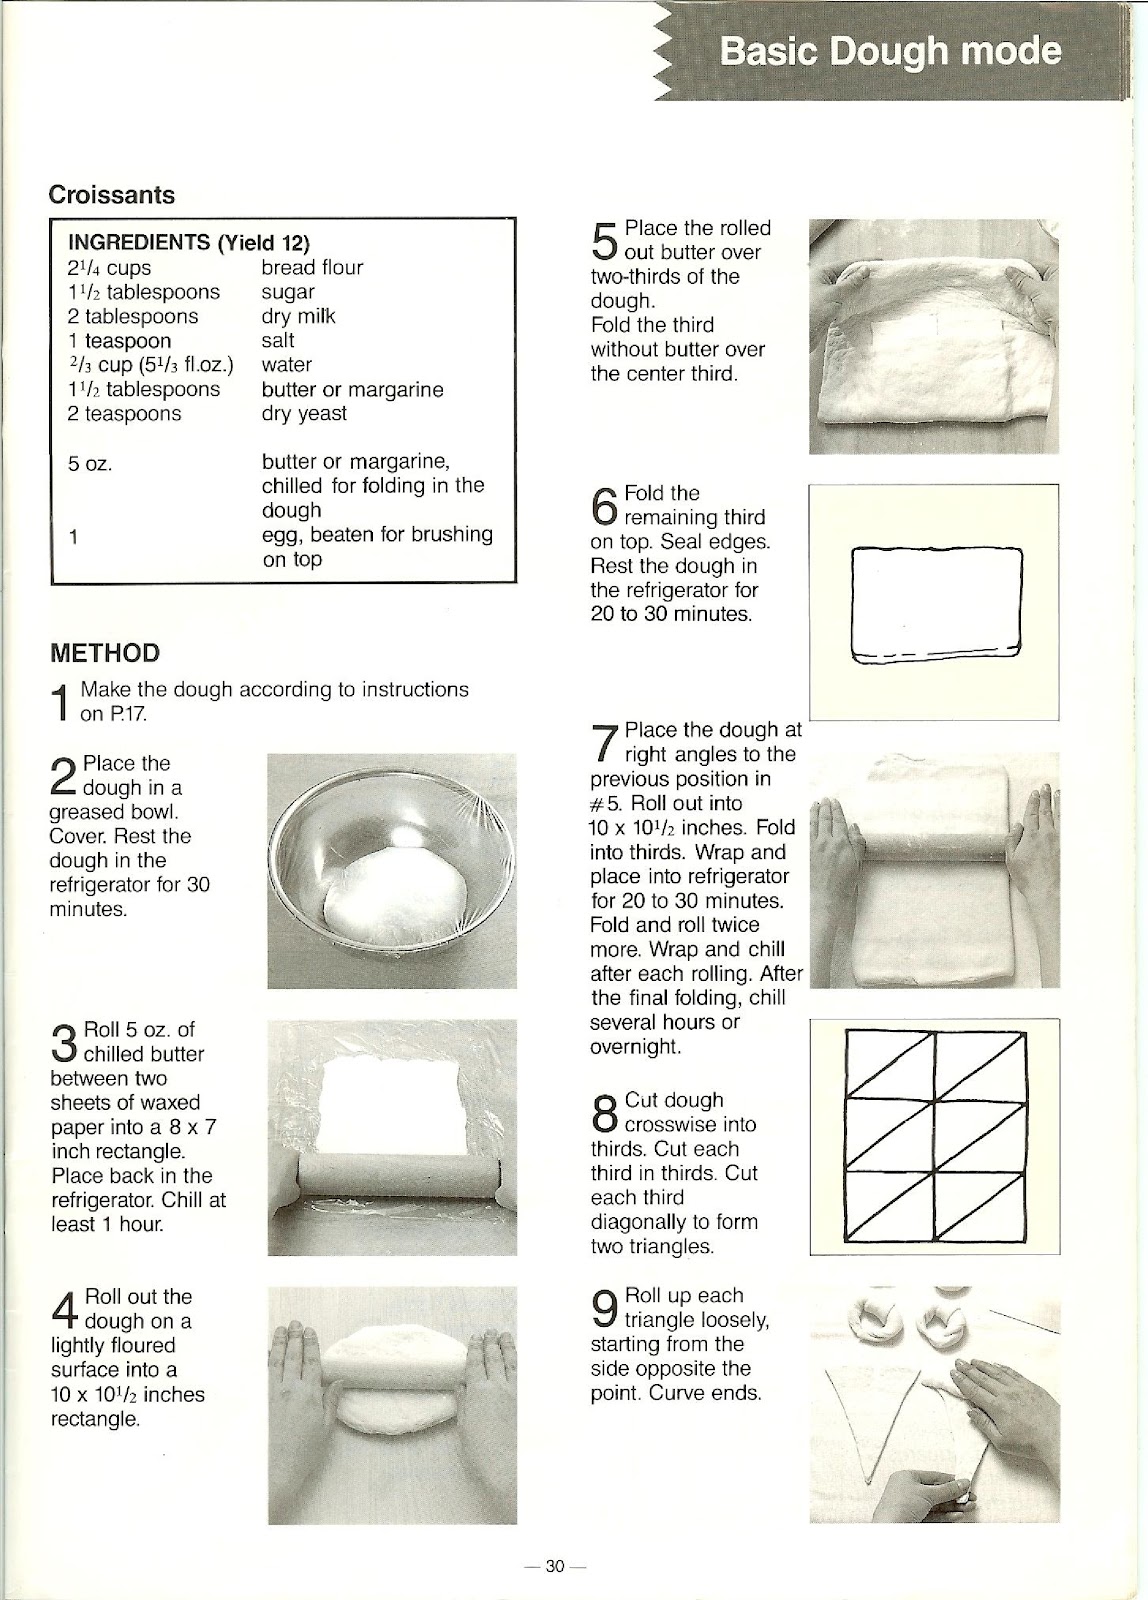
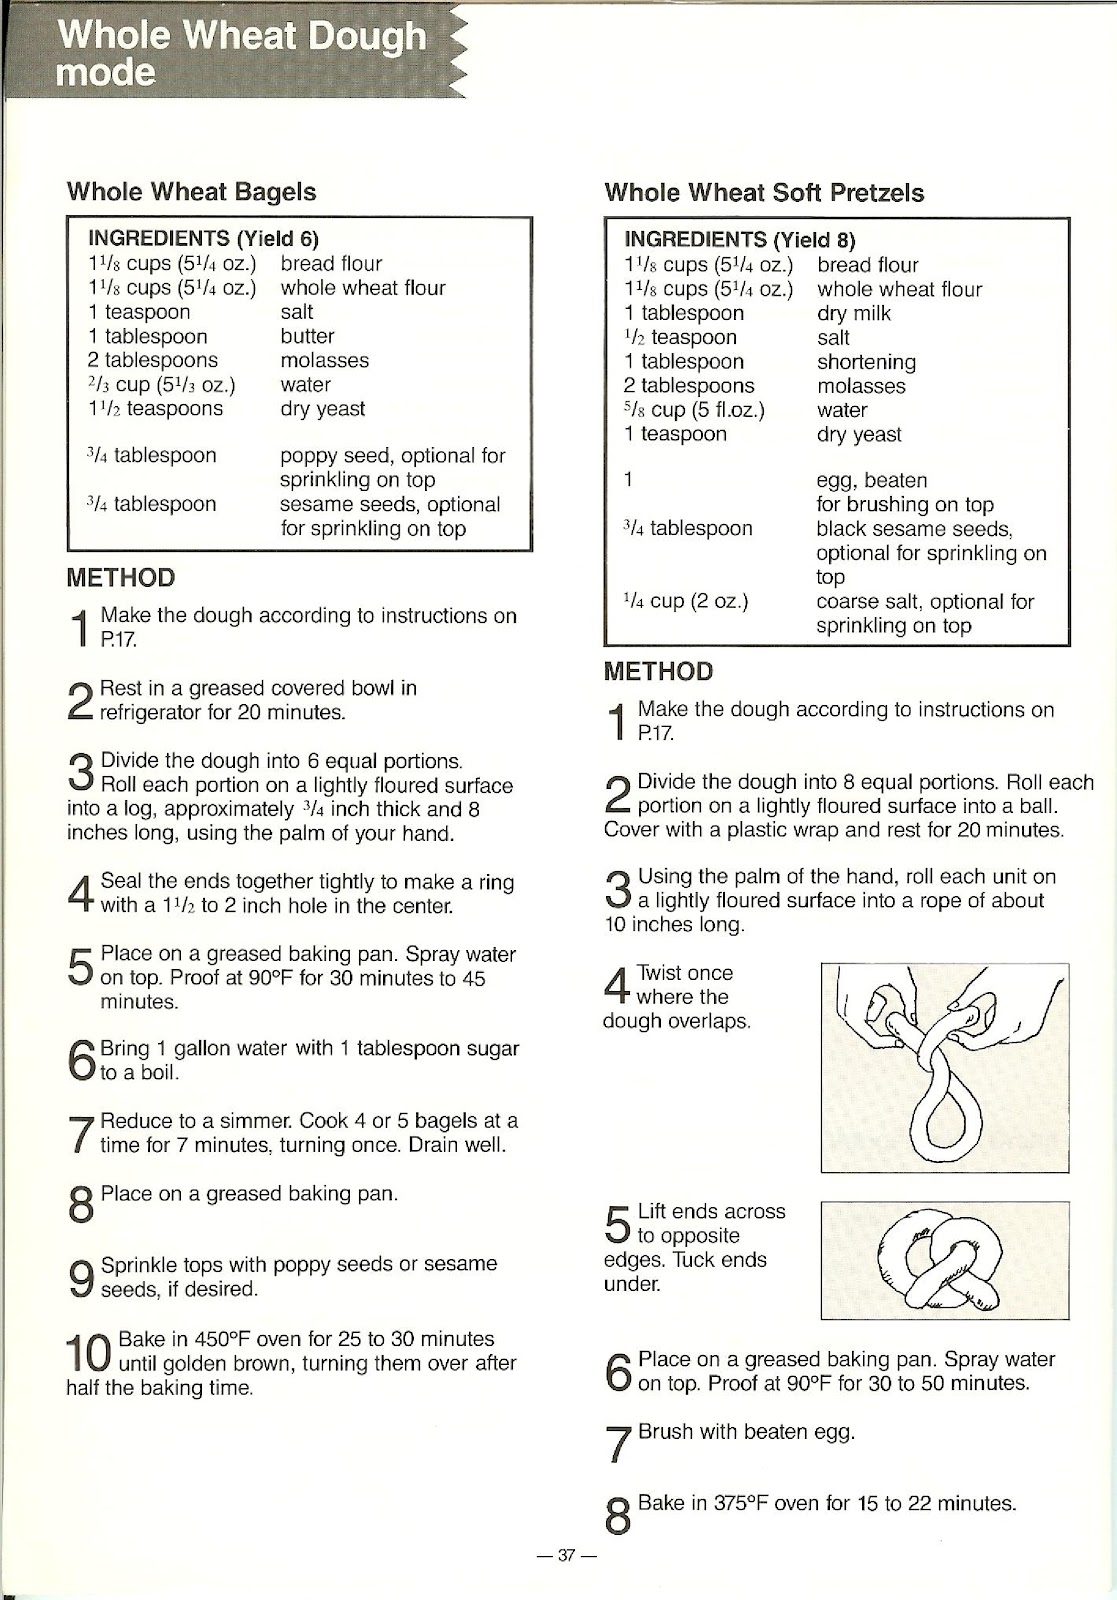
DOUGH: The unit automatically prepares dough for items like pizzas, dinner rolls, doughnuts, croissants, and bagels. The process is automatic from mixing to punching.
Additionally, a 13-hour timer allows you to prepare ingredients the night before for freshly baked bread in the morning (for BAKE and BAKE (LIGHT) modes only). The beeper will sound eight times when the BAKE or DOUGH cycle is complete.
How long does each baking cycle take on the PANASONIC SD-BT55P?
The time required for each mode (when the timer is not used) is as follows:
| Baking mode | Time |
|---|---|
| BAKE | 4 hours |
| BAKE (LIGHT) | 4 hours |
| BAKE (RAPID) | 3 hours |
| DOUGH | 2 hours 25 minutes |
| Baking mode | Time |
|---|---|
| BAKE | 5 hours |
| BAKE (RAPID) | 3 hours |
| DOUGH | 3 hours 15 minutes |
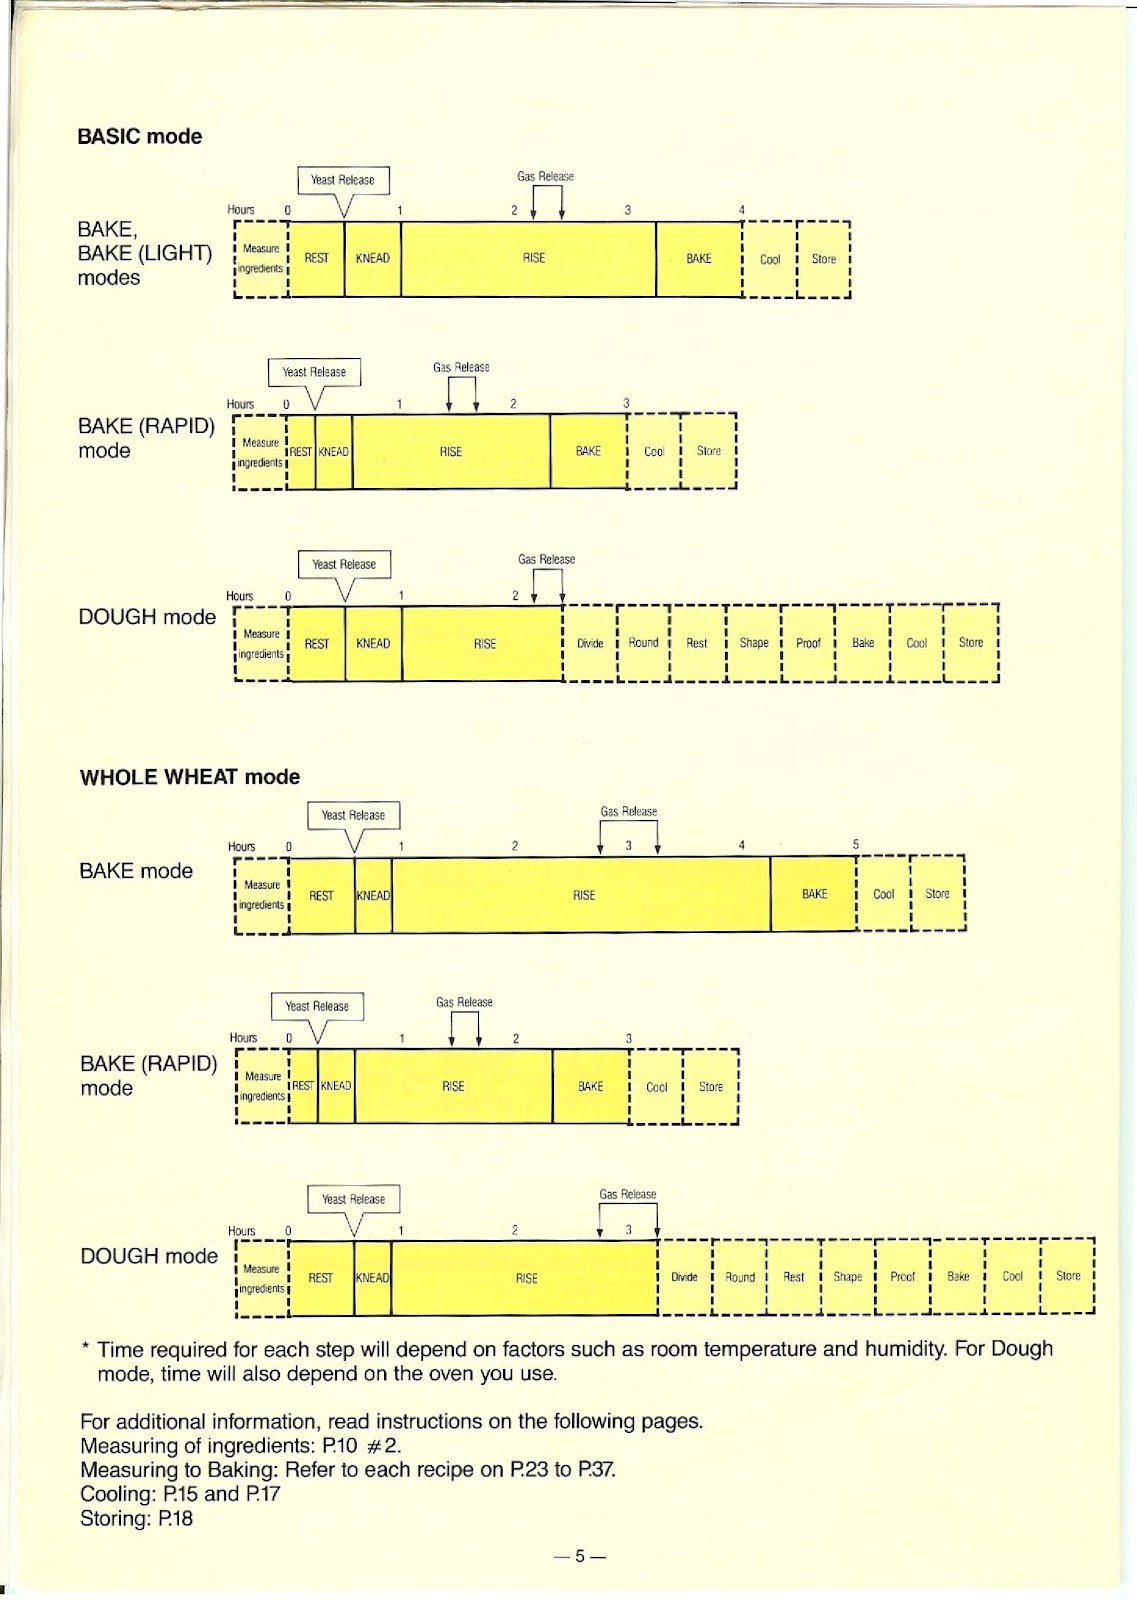
What are the automatic process steps for each mode on the PANASONIC SD-BT55P?
The PANASONIC SD-BT55P automates several steps of the bread-making process. The sequence depends on the mode selected:
BASIC – BAKE / BAKE (LIGHT) modes (4 hours):
1. REST
2. KNEAD
3. RISE
4. BAKE
5. Cool/Store
BASIC – BAKE (RAPID) mode (3 hours):
1. REST
2. KNEAD
3. RISE
4. BAKE
5. Cool/Store
BASIC – DOUGH mode (2 hours 25 minutes):
1. REST
2. KNEAD
3. RISE
4. The cycle stops here. The remaining steps (Divide, Round, Rest, Shape, Proof, Bake) are done manually.
WHOLE WHEAT – BAKE mode (5 hours):
1. REST
2. KNEAD
3. RISE
4. BAKE
5. Cool/Store
WHOLE WHEAT – BAKE (RAPID) mode (3 hours):
1. REST
2. KNEAD
3. RISE
4. BAKE
5. Cool/Store
WHOLE WHEAT – DOUGH mode (3 hours 15 minutes):
1. REST
2. KNEAD
3. RISE
4. The cycle stops here. The remaining steps are done manually.
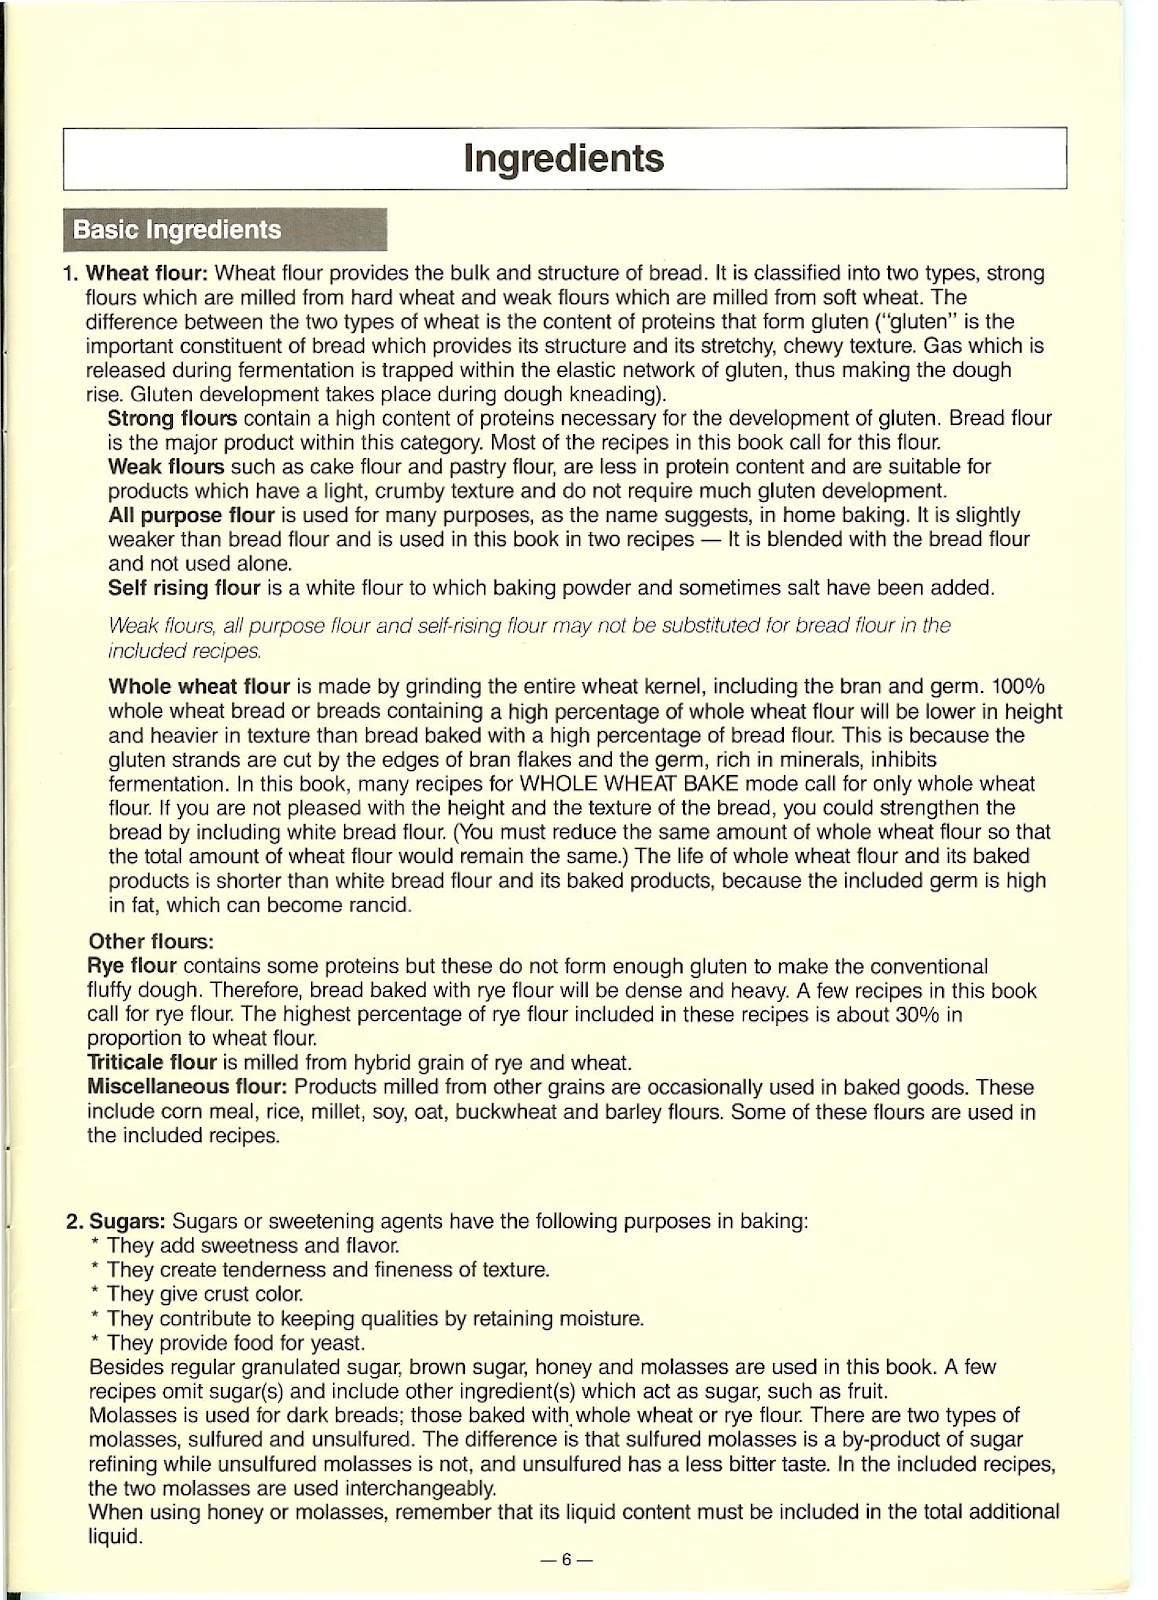
What types of flour can I use with the PANASONIC SD-BT55P?
Bread Flour: This is a strong flour with a high protein content necessary for gluten development. Most recipes for the PANASONIC SD-BT55P call for this flour.
All-Purpose Flour: It is slightly weaker than bread flour and is used in a few recipes, blended with bread flour, but not used alone.
Whole Wheat Flour: Made from the entire wheat kernel. Breads made with 100% whole wheat flour will be lower in height and heavier in texture. Many WHOLE WHEAT mode recipes call for only this flour.
Other Flours (Rye, Triticale, Corn Meal, etc.): These are used in specific recipes. Rye flour results in a dense, heavy bread. The highest percentage of rye flour used in the recipes is about 30% in proportion to wheat flour.
Important: Weak flours (like cake or pastry flour) and self-rising flour should not be substituted for bread flour in the included recipes.
What is the role of other key ingredients like yeast, sugar, salt, and liquids in the PANASONIC SD-BT55P?
Yeast: Use either rapid rise or active dry yeast. Do not use compressed yeast or yeast that requires preliminary fermentation. Yeast should be placed dry in the yeast dispenser on the top lid. Store yeast in the refrigerator.
Sugars: Sugars (granulated, brown, honey, molasses) add sweetness and flavor, create tenderness, give crust color, retain moisture, and provide food for the yeast.
Fats: Fats like butter, margarine, or oil tenderize the product, add flavor and richness, help with keeping qualities, and give flakiness to pastry.
Milk Products: Milk enhances flavor and increases nutritional value. Nonfat dry milk is recommended for its convenience and cost.
Salt: Salt strengthens the gluten structure, makes the dough more elastic, and inhibits yeast growth. Too much salt will inhibit fermentation, while too little will result in a weak gluten structure.
Liquids: Liquid (like water or milk) is an important element. A small difference in quantity can affect the height and texture of the bread. The liquid content in other ingredients like molasses, eggs, and fruit must be accounted for.
What is the basic bread formula ratio for the PANASONIC SD-BT55P?
The formula of basic white bread and 100% whole wheat bread for this model is as follows, representing the ratio of ingredient weights:
| Ingredient | Ratio |
|---|---|
| wheat flour | 100 |
| sugar | 5.6 |
| butter | 3.6 |
| non-fat dry milk | 2 |
| salt | 1.6 |
| water | 69 |
| dry yeast | 1 |
How can I achieve the best baking results with my PANASONIC SD-BT55P?
To avoid poor baking results, remember the following tips:
1. Bake at Optimum Temperature: The PANASONIC SD-BT55P is designed to work best when the room temperature is between 41°F to 86°F. For best results, bake in a room between 68°F to 77°F. If the room is very cold (41°F – 59°F), use warm water of 77°F to 95°F.
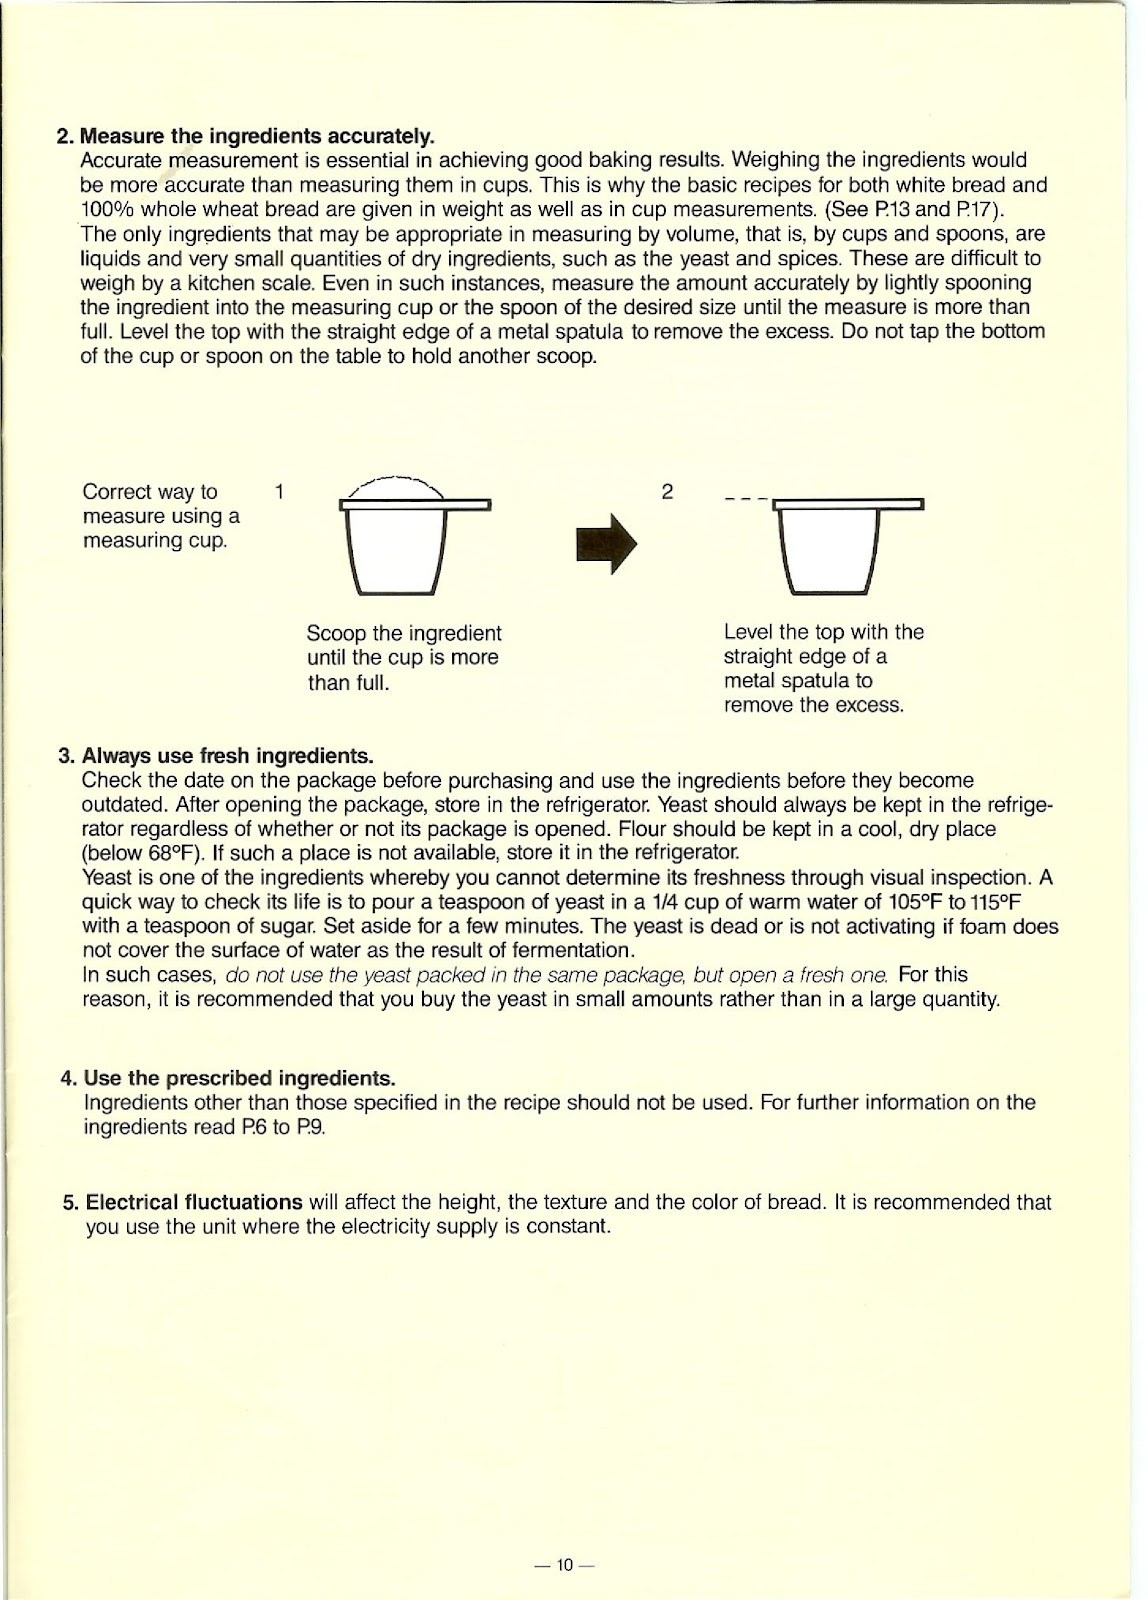
2. Measure Ingredients Accurately: Accurate measurement is essential. Weighing ingredients is more accurate than using cups. If using measuring cups, lightly spoon the ingredient into the cup until it is more than full, then level the top with the straight edge of a spatula. Do not tap the cup.
3. Always Use Fresh Ingredients: Check expiration dates. Store flour in a cool, dry place (below 68°F) or in the refrigerator. Yeast should always be kept in the refrigerator.
4. Use the Prescribed Ingredients: Do not substitute ingredients other than those specified in the recipe.
5. Ensure Consistent Electricity Supply: Electrical fluctuations can affect the height, texture, and color of the bread. It is recommended to use the unit where the electricity supply is constant.
What are the main parts and accessories of the PANASONIC SD-BT55P?
The main parts of the PANASONIC SD-BT55P are:
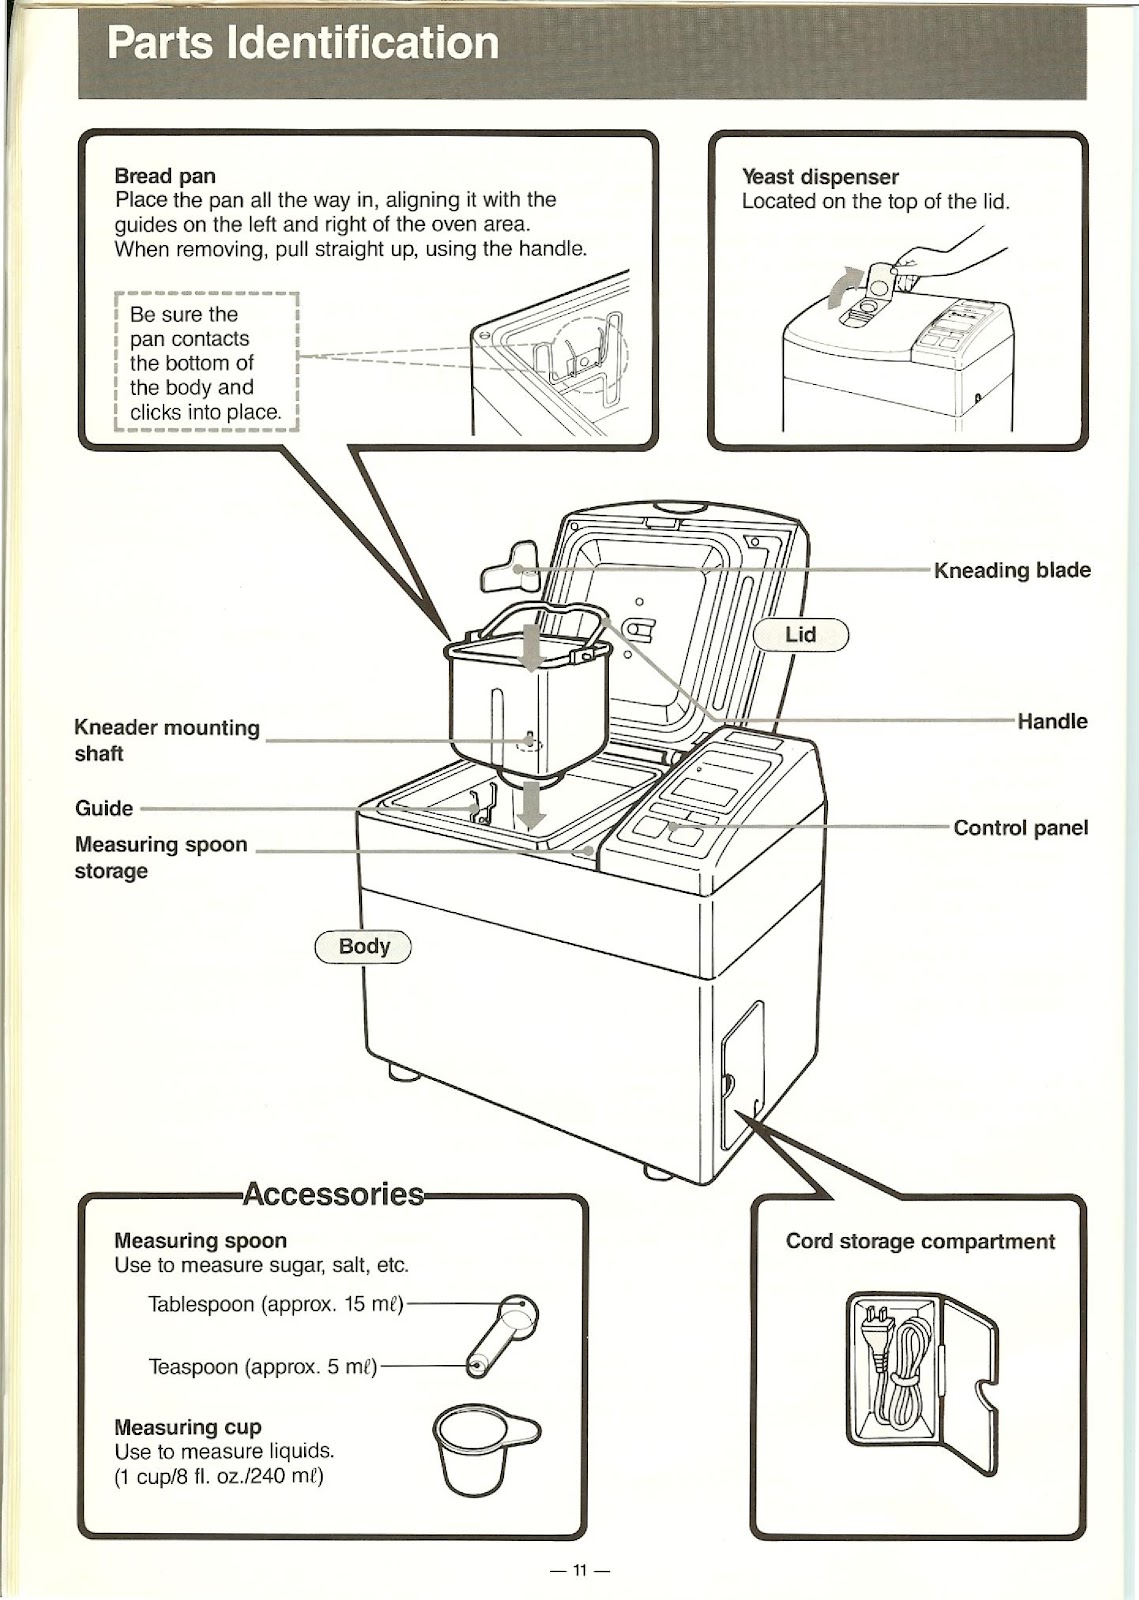
Body: The main unit of the bread maker.
Lid: The top cover of the unit.
Yeast Dispenser: Located on the top of the lid to hold the dry yeast.
Control Panel: The interface for selecting modes and starting operation.
Bread Pan: A removable pan where ingredients are placed. It clicks into place inside the oven area.
Handle: For lifting the bread pan.
Kneading Blade: A small blade that attaches to the shaft inside the bread pan to mix and knead the dough.
Kneader Mounting Shaft: The post inside the bread pan where the kneading blade is mounted.
Cord Storage Compartment: For storing the power cord.
The included accessories are:
Measuring Spoon: A double-sided spoon for measuring teaspoons (approx. 5 ml) and tablespoons (approx. 15 ml) of sugar, salt, etc.
Measuring Cup: For measuring liquids (1 cup / 8 fl. oz. / 240 ml).
How do I use the control panel and display on the PANASONIC SD-BT55P?
The control panel consists of several pads and a display window:
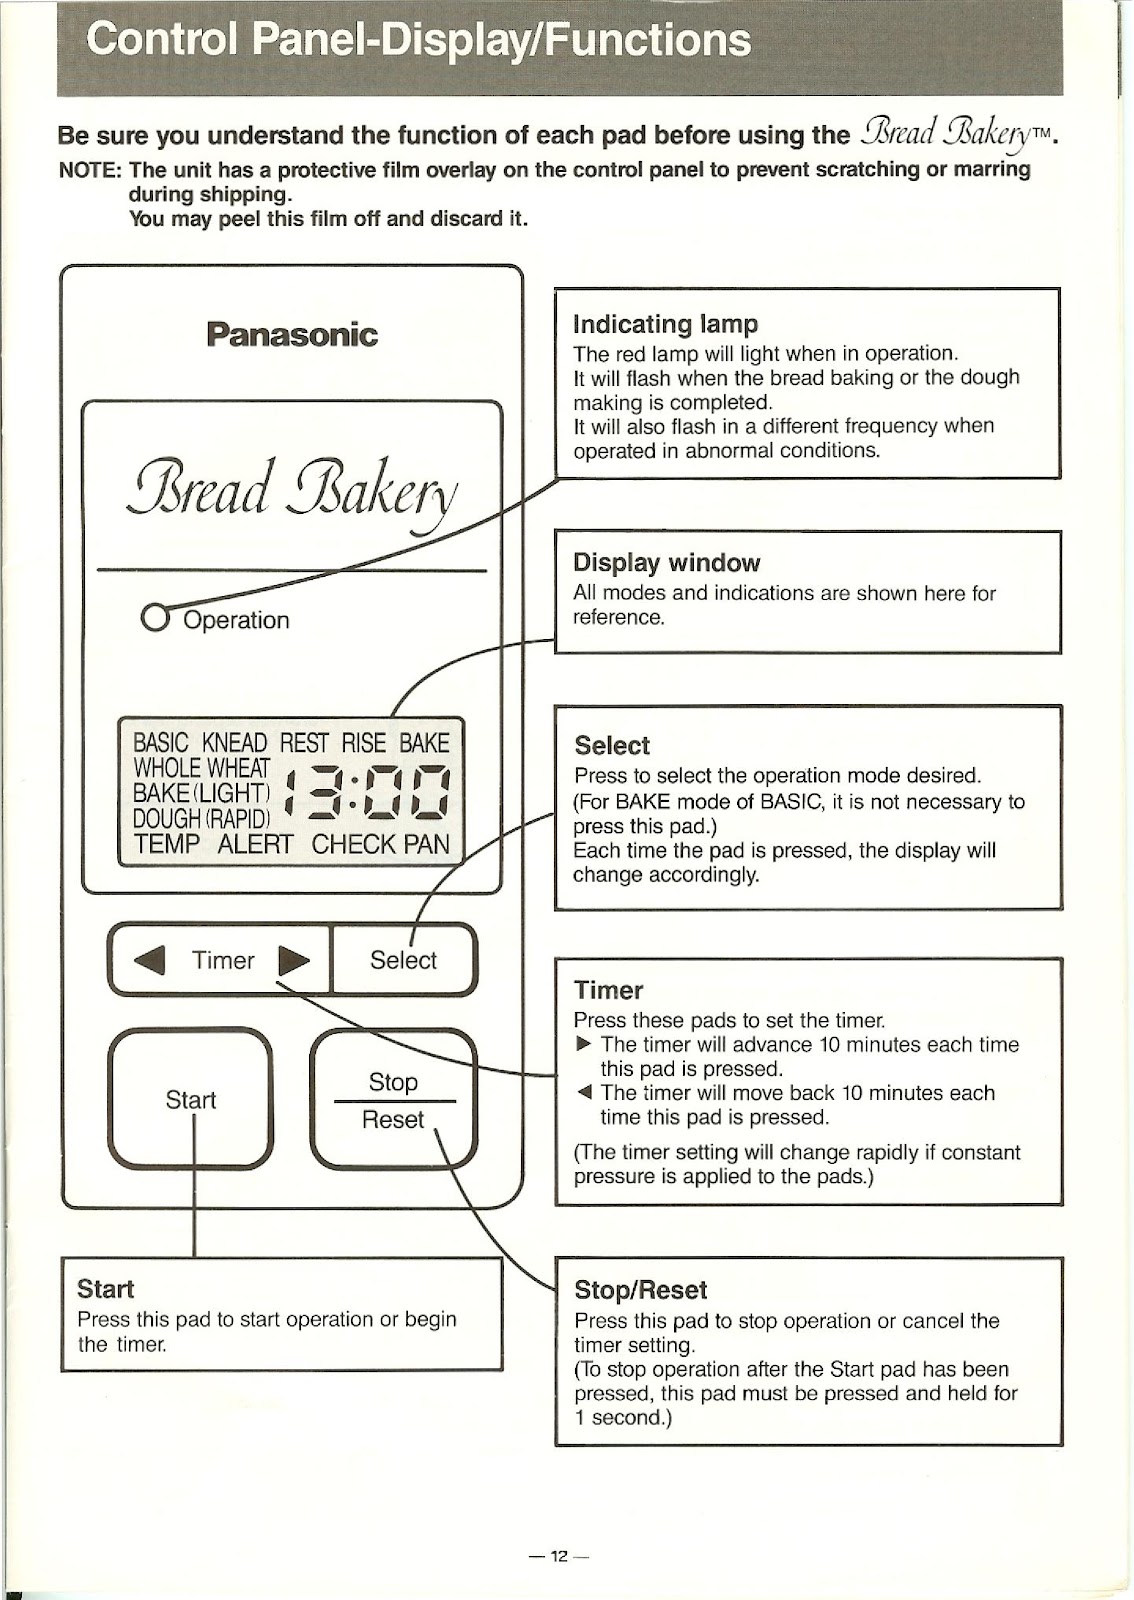
Indicating Lamp (Operation): The red lamp lights up when in operation. It flashes when the bread is finished or if there is an abnormal condition.
Display Window: Shows the selected mode, process step (KNEAD, REST, RISE, BAKE), and time remaining. It also shows alerts like TEMP, ALERT, and CHECK PAN.
Select Pad: Press to cycle through the available operation modes (e.g., WHOLE WHEAT, BAKE (LIGHT), DOUGH, etc.). For the standard BASIC BAKE mode, it is not necessary to press this pad.
Timer Pads (◄ / ►): Press these pads to set the delay timer. The left arrow (◄) moves the time back 10 minutes per press, and the right arrow (►) advances it 10 minutes per press.
Start Pad: Press this pad to start the selected operation or to begin the timer countdown.
Stop/Reset Pad: Press this pad to stop an operation or cancel a timer setting. To stop an operation after the Start pad has been pressed, this pad must be pressed and held for 1 second.
How do I bake bread using the BAKE mode on the PANASONIC SD-BT55P?
Follow these steps to bake basic or whole wheat bread:
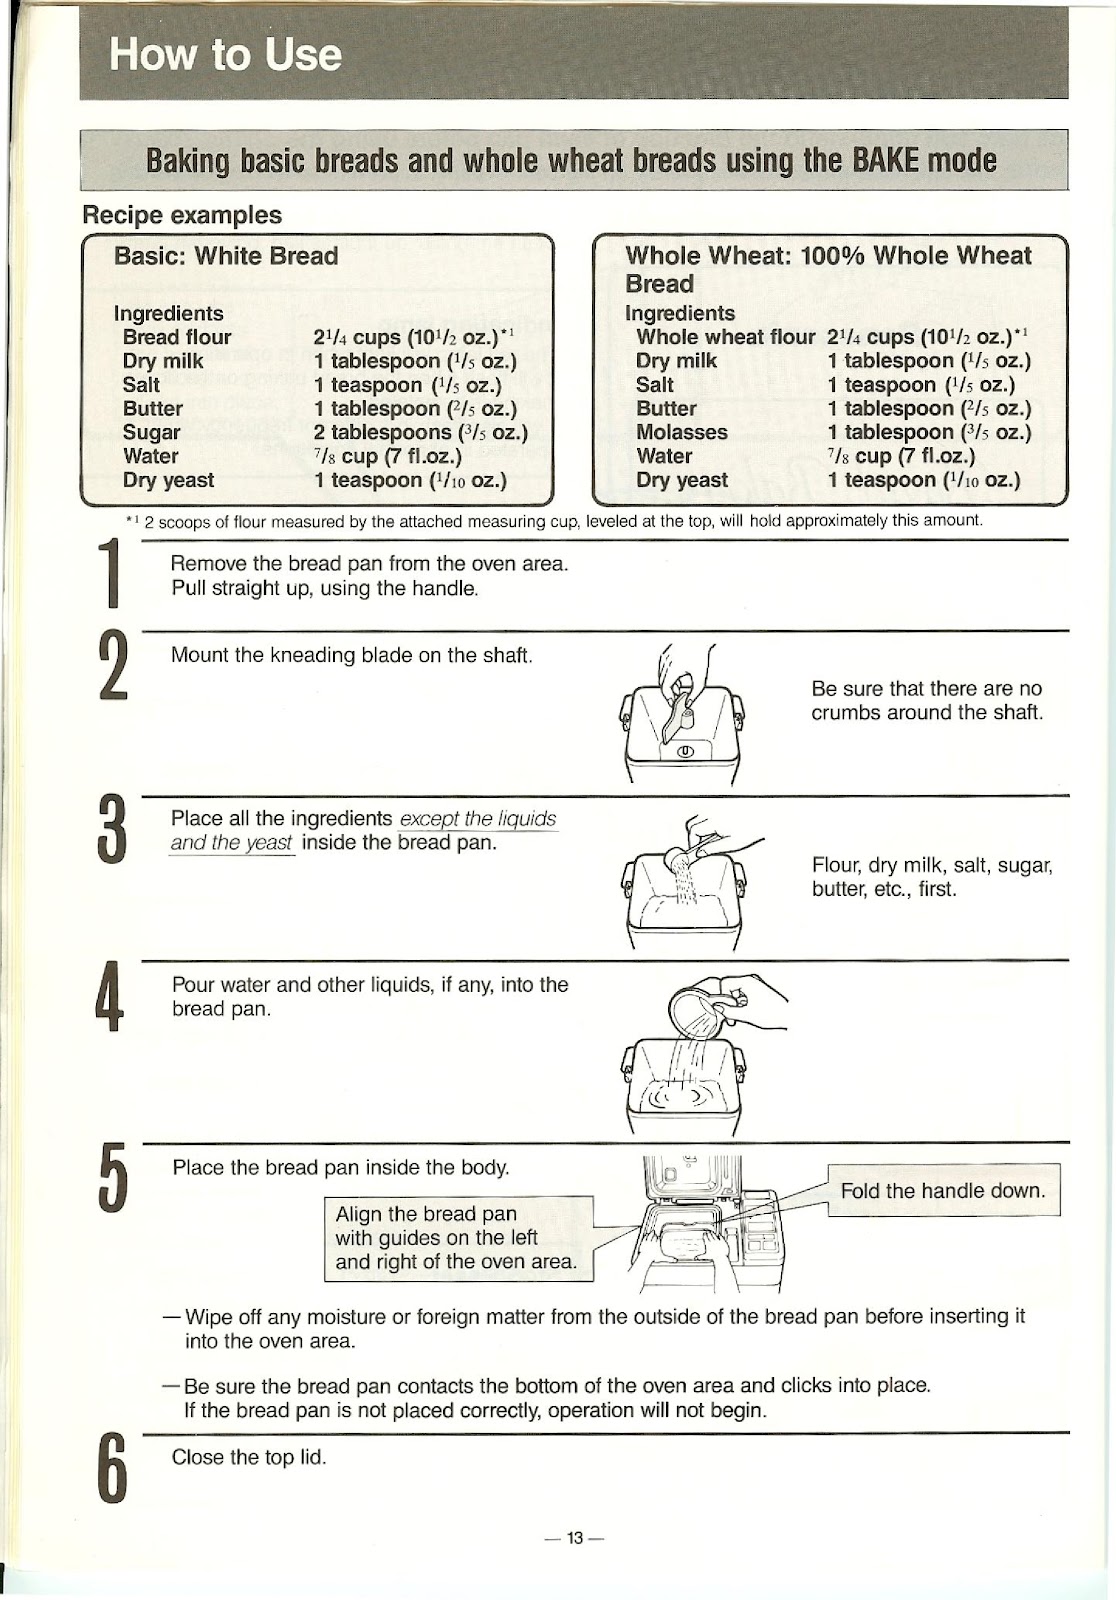
1. Remove the bread pan from the oven area by pulling it straight up with the handle.
2. Mount the kneading blade on the shaft inside the pan. Ensure there are no crumbs around the shaft.
3. Place all dry ingredients (flour, dry milk, salt, sugar, butter) EXCEPT the yeast inside the bread pan.
4. Pour water and any other liquids into the bread pan.
5. Place the bread pan back inside the body, aligning it with the guides. Ensure it clicks into place and fold the handle down.
6. Close the top lid.
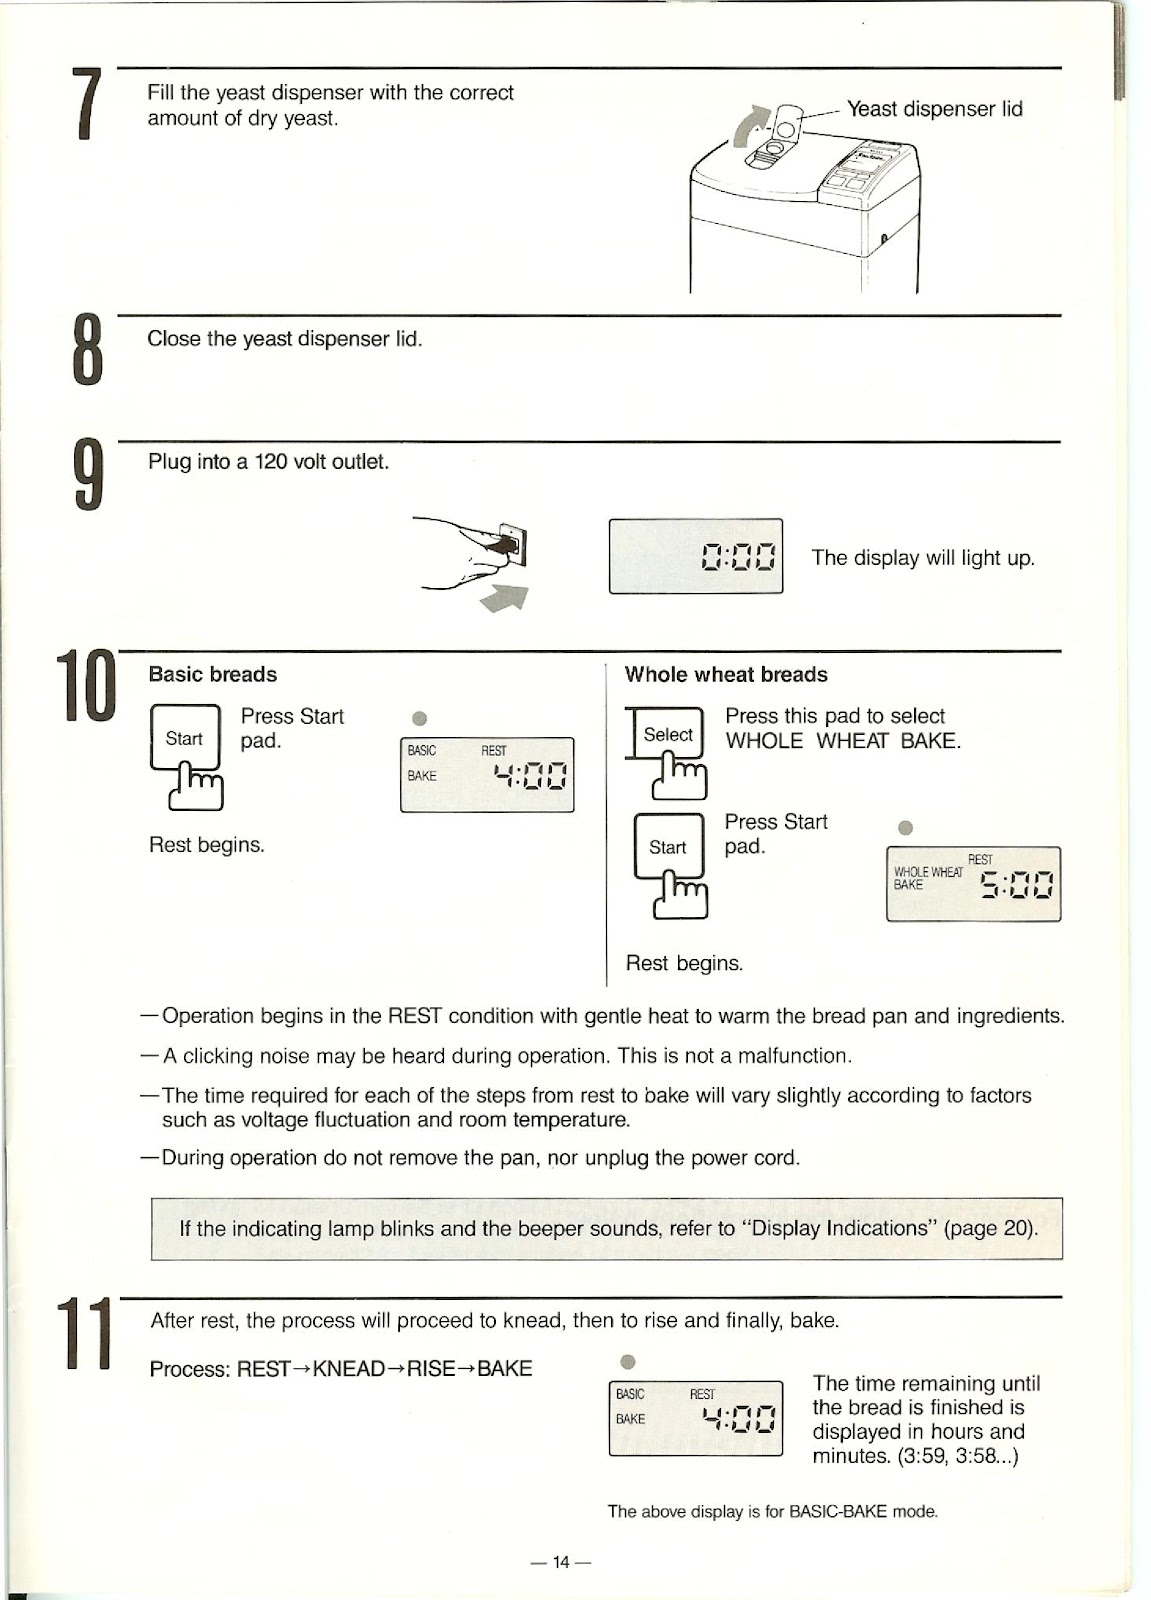
7. Fill the yeast dispenser on the lid with the correct amount of dry yeast.
8. Close the yeast dispenser lid.
9. Plug the unit into a 120-volt outlet. The display will light up showing “0:00”.
10. For BASIC bread, the unit defaults to this setting (display shows “4:00”). For WHOLE WHEAT bread, press the ‘Select’ pad until WHOLE WHEAT BAKE is selected (display shows “5:00”).
11. Press the ‘Start’ pad. The operation will begin in the REST condition.
12. The unit will proceed through REST, KNEAD, RISE, and BAKE cycles automatically.
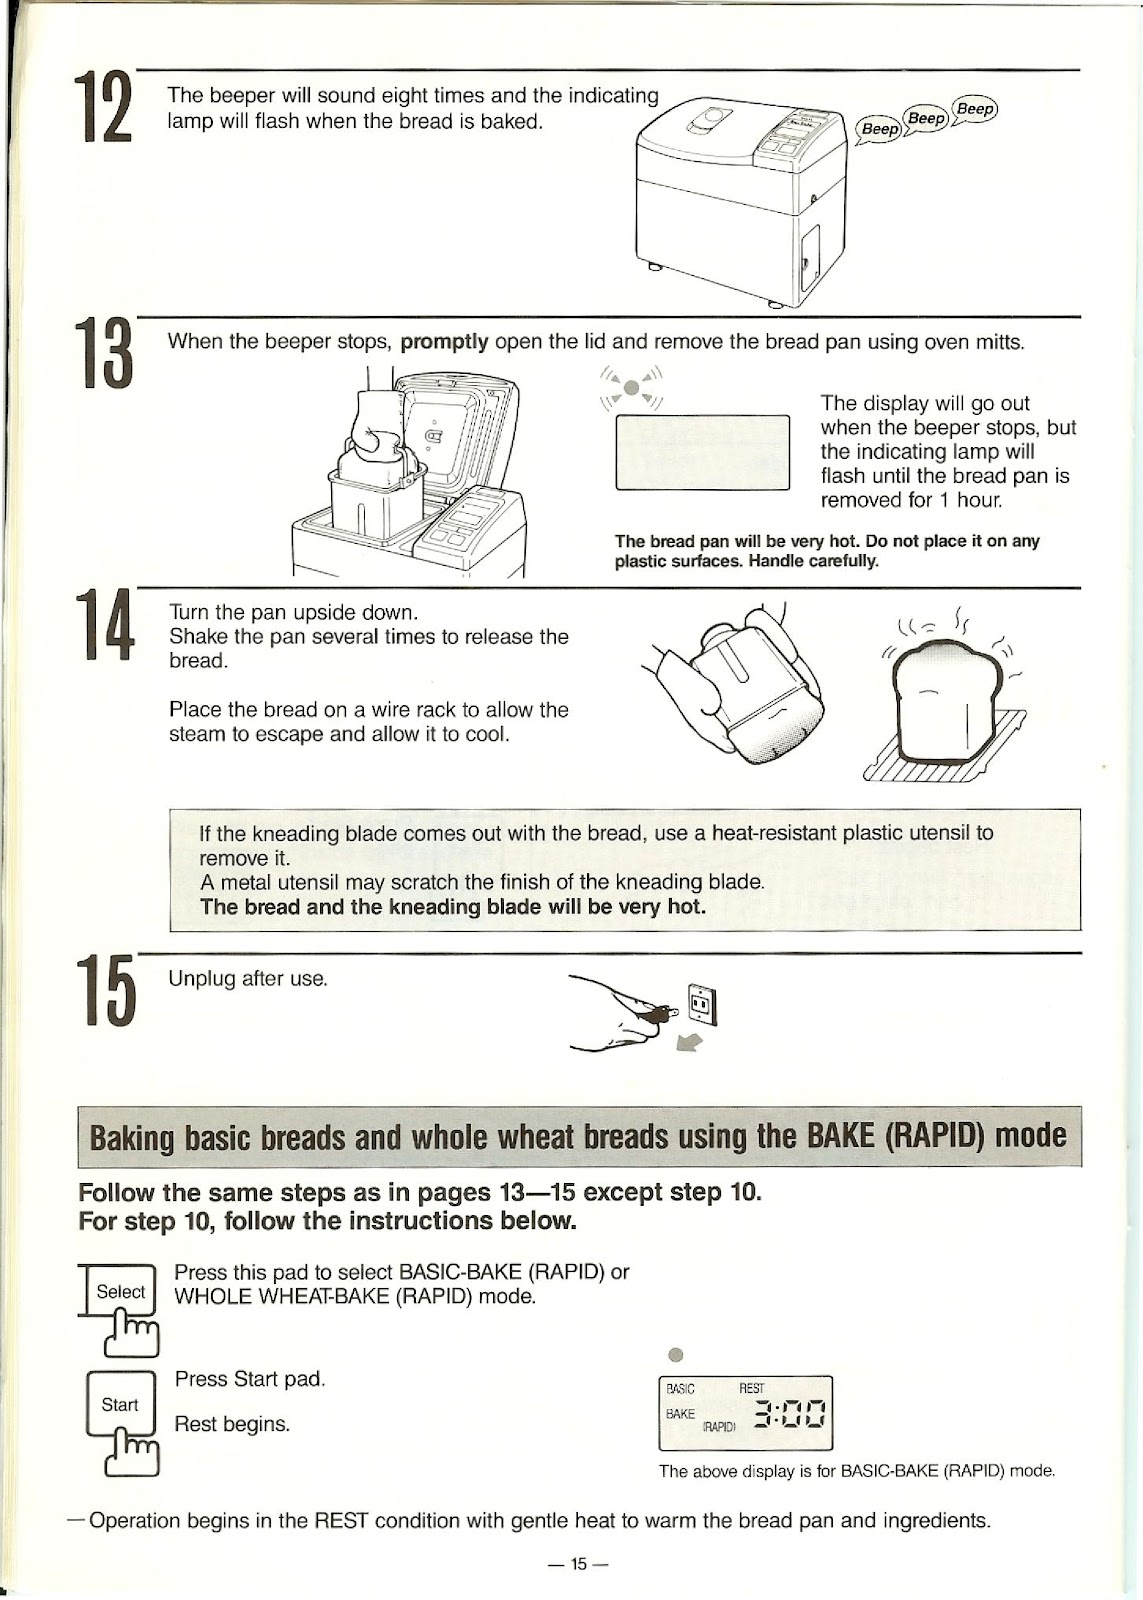
13. When the bread is baked, the beeper will sound eight times and the indicating lamp will flash.
14. Promptly open the lid and remove the bread pan using oven mitts. The pan will be very hot.
15. Turn the pan upside down and shake it several times to release the bread. Place the bread on a wire rack to cool.
16. Unplug the unit after use. If the kneading blade comes out with the bread, use a heat-resistant plastic utensil to remove it once it has cooled.
How do I use the BAKE (RAPID), BAKE (LIGHT), and DOUGH modes on the PANASONIC SD-BT55P?
For BAKE (RAPID) Mode:
Follow the same steps 1-9 for standard baking. At step 10, press the ‘Select’ pad to choose either BASIC-BAKE (RAPID) (display shows “3:00”) or WHOLE WHEAT-BAKE (RAPID). Then press ‘Start’.
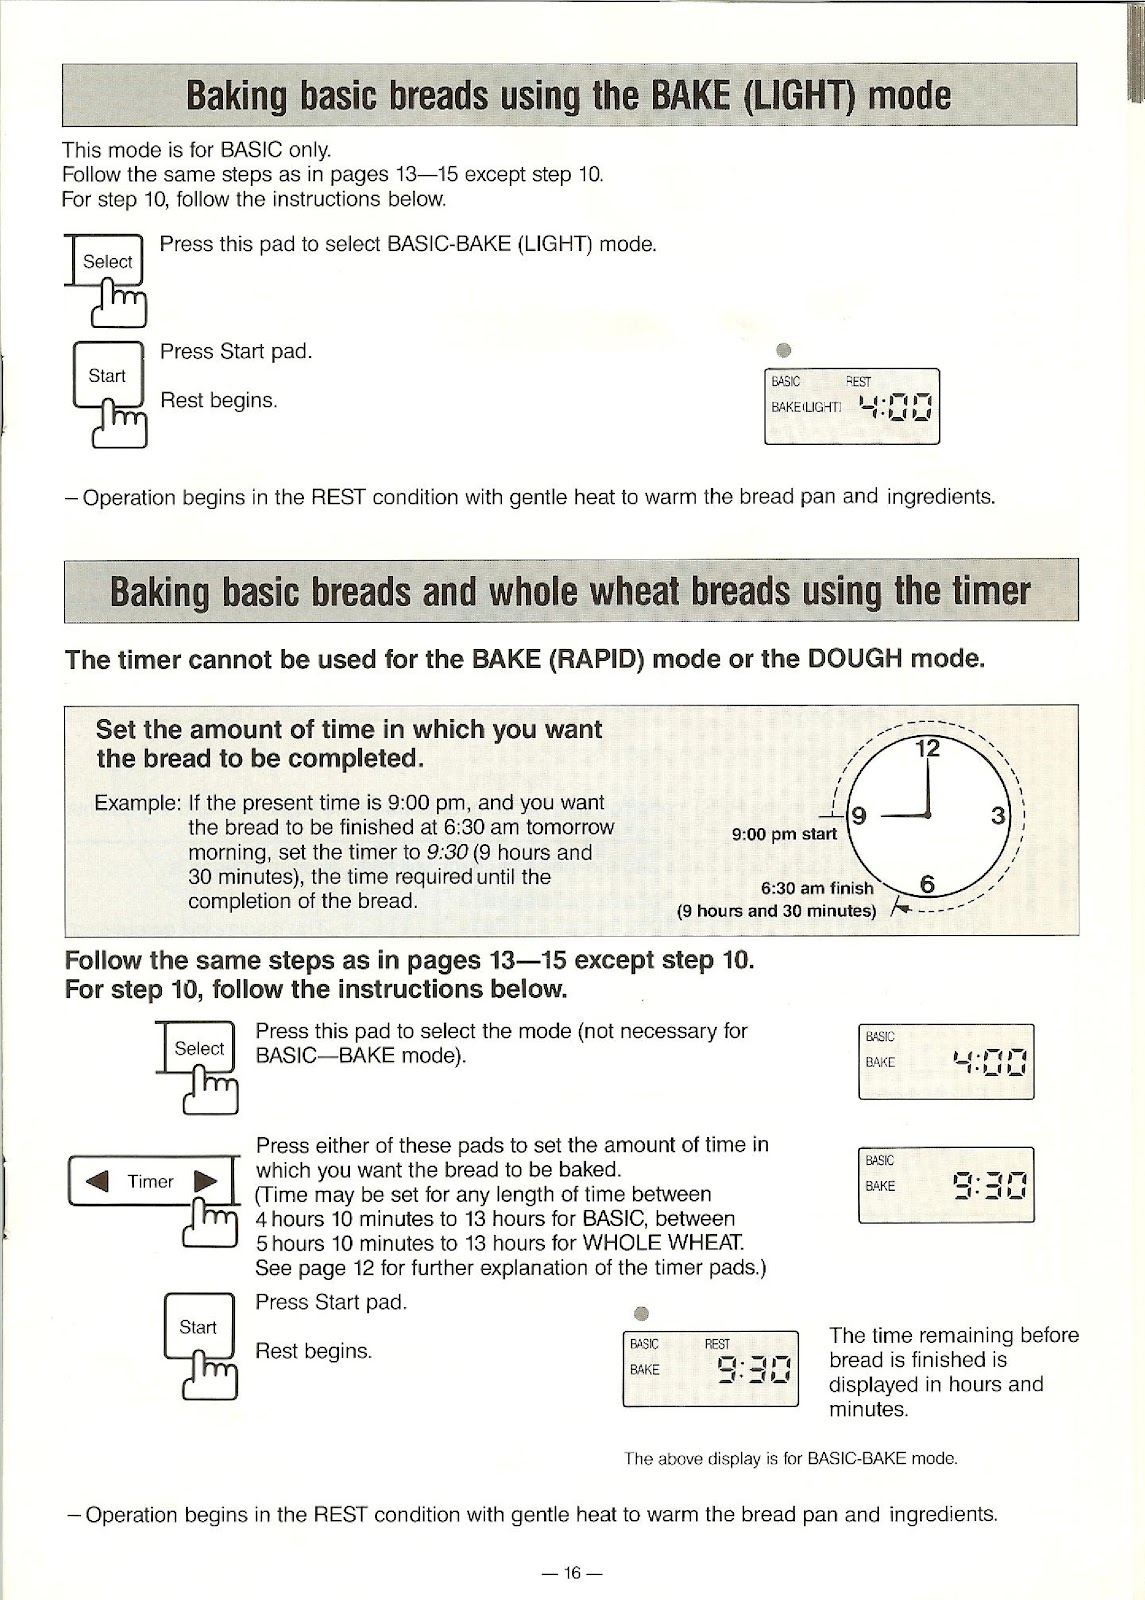
For BAKE (LIGHT) Mode (BASIC only):
Follow the same steps 1-9 for standard baking. At step 10, press the ‘Select’ pad to choose BASIC-BAKE (LIGHT) (display shows “4:00”). Then press ‘Start’.
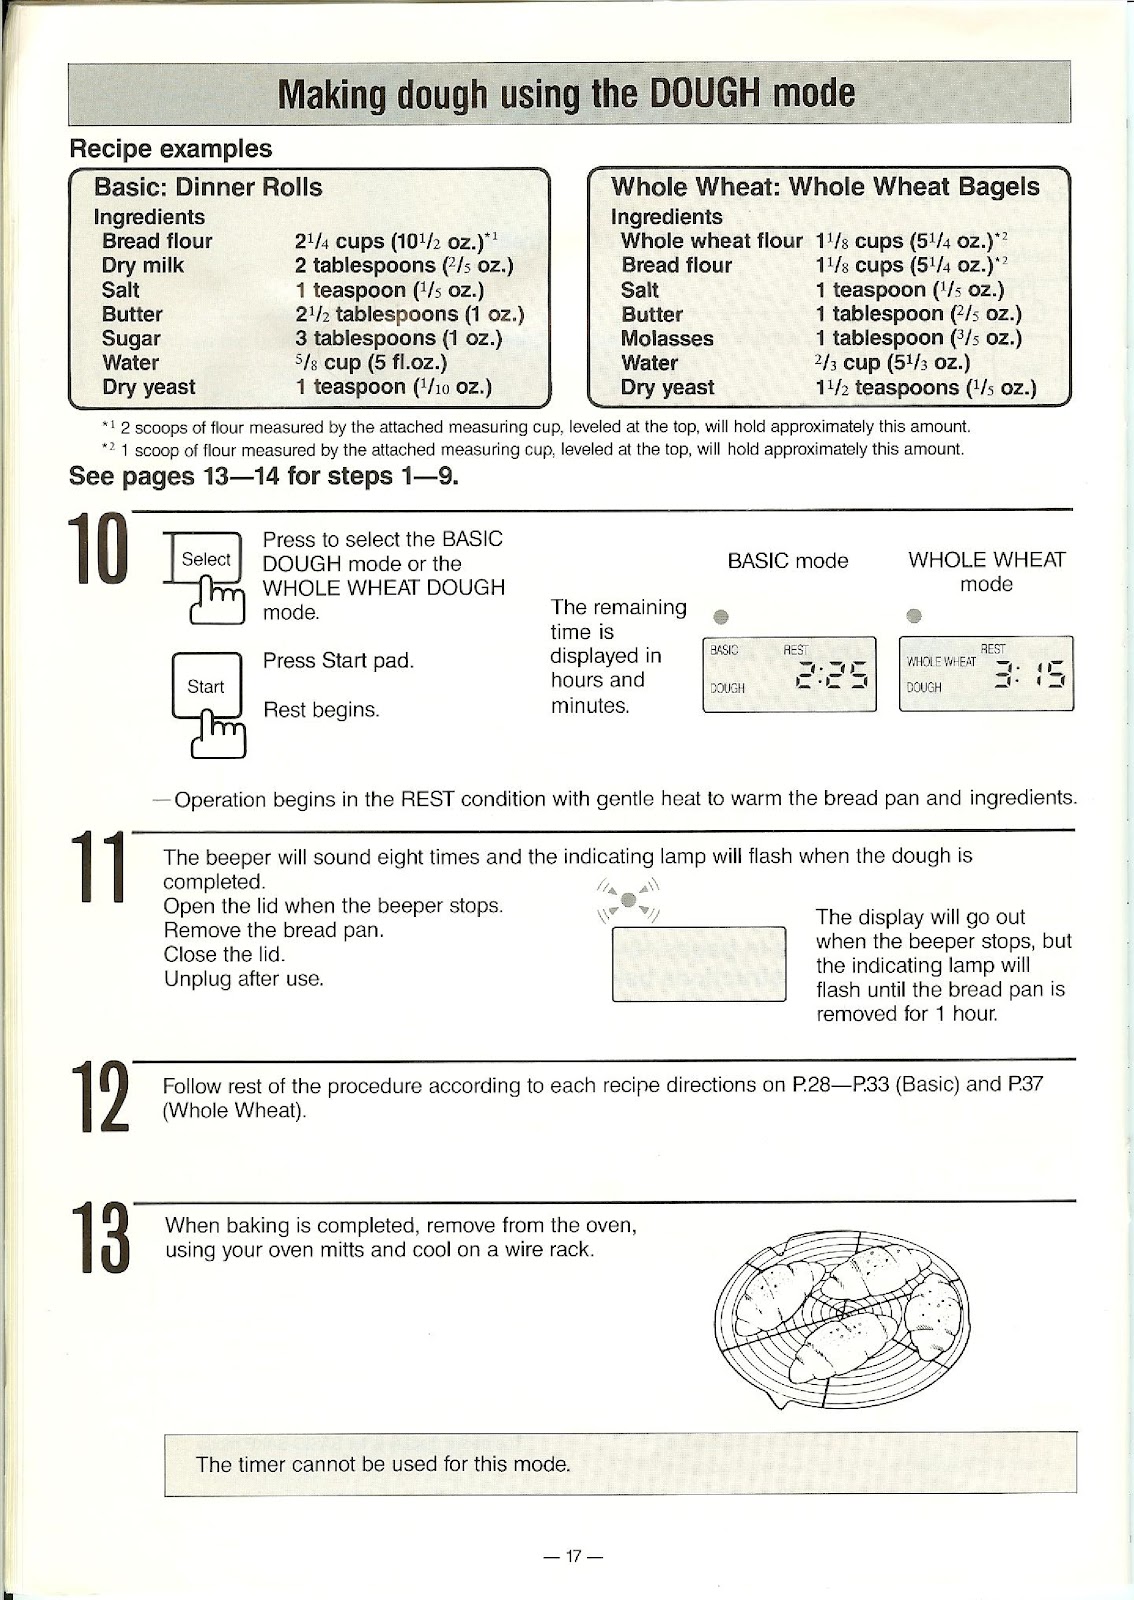
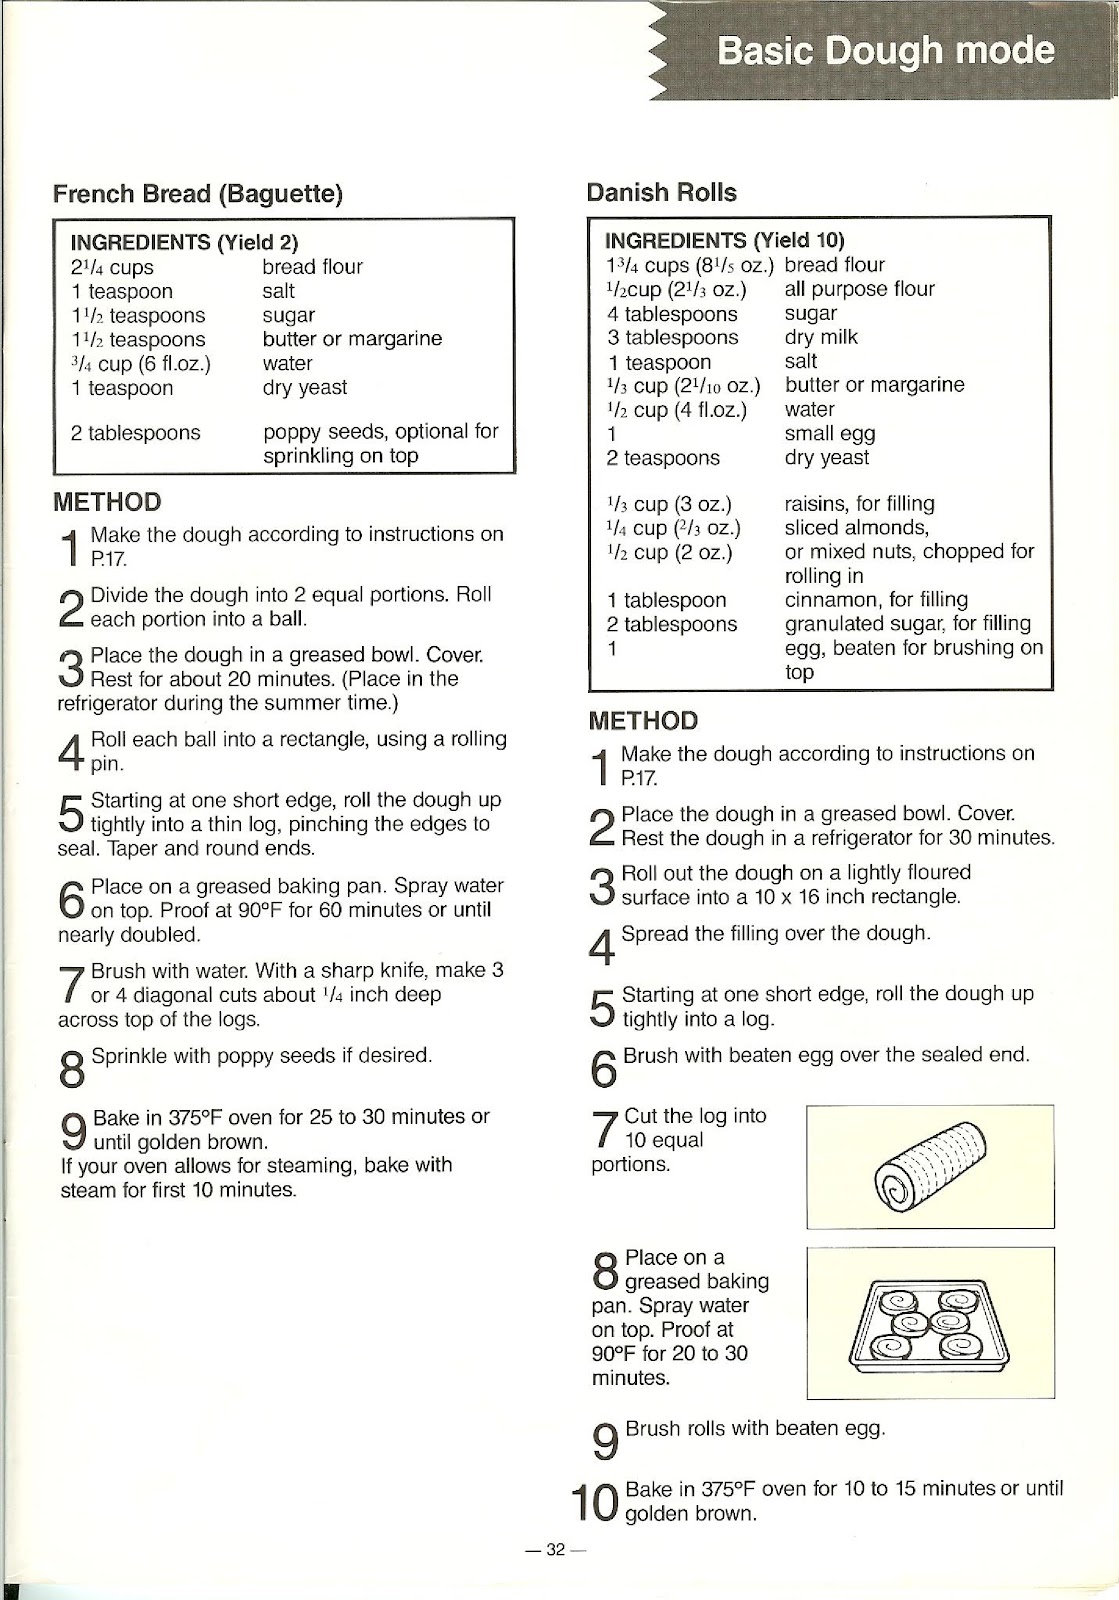
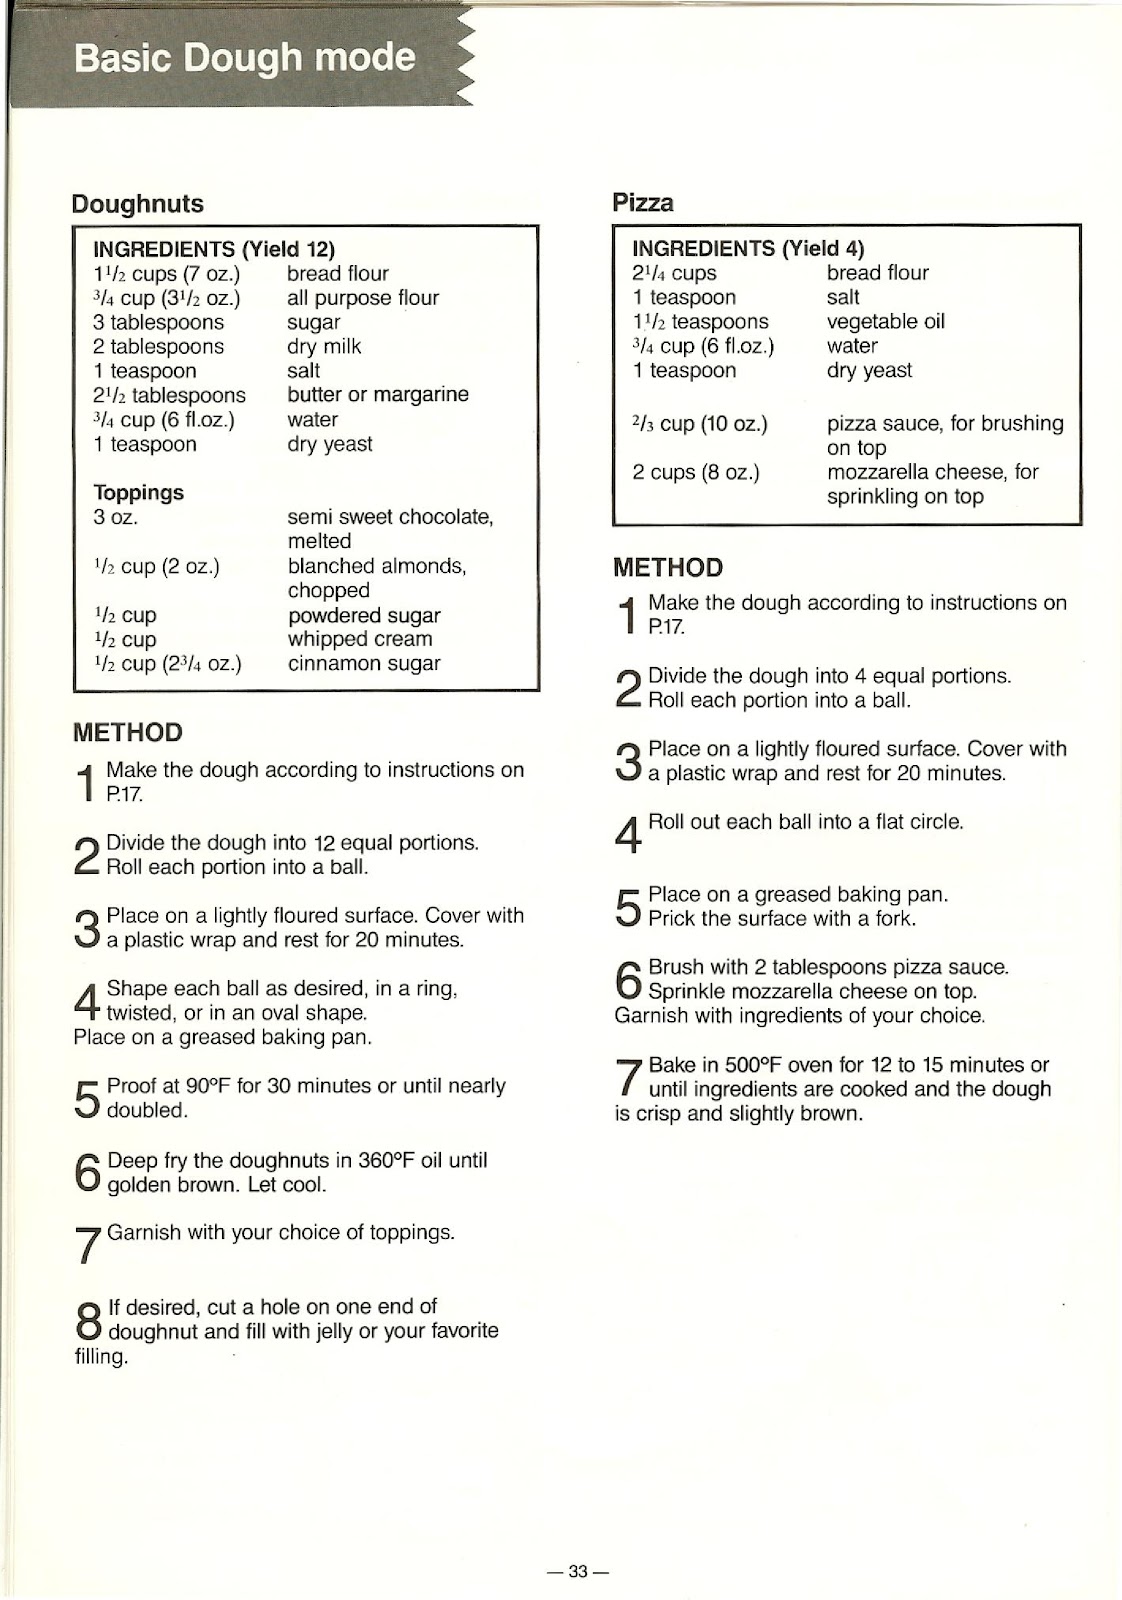
For DOUGH Mode:
Follow steps 1-9 for standard baking using a dough recipe. At step 10, press the ‘Select’ pad to choose either the BASIC DOUGH mode (display shows “2:25”) or the WHOLE WHEAT DOUGH mode (display shows “3:15”). Press ‘Start’. When the cycle is complete, the beeper will sound eight times. Remove the bread pan, take out the dough, and proceed with the manual shaping and baking instructions for your recipe.
How do I use the timer on the PANASONIC SD-BT55P?
The timer can be used for BAKE and BAKE (LIGHT) modes only; it cannot be used for BAKE (RAPID) or DOUGH modes.
1. Follow steps 1-9 for standard baking.
2. At step 10, select your desired mode (e.g., BASIC-BAKE).
3. Use the ‘Timer’ pads (◄ / ►) to set the total time until you want the bread to be completed. For example, if it is 9:00 pm and you want bread at 6:30 am, set the timer to 9:30 (9 hours and 30 minutes).
4. The settable time range is from 4 hours 10 minutes to 13 hours for BASIC, and 5 hours 10 minutes to 13 hours for WHOLE WHEAT.
5. Press the ‘Start’ pad. The display will show the time remaining, and the operation will begin in the REST condition when appropriate.
How should I slice and store homemade bread from the PANASONIC SD-BT55P?
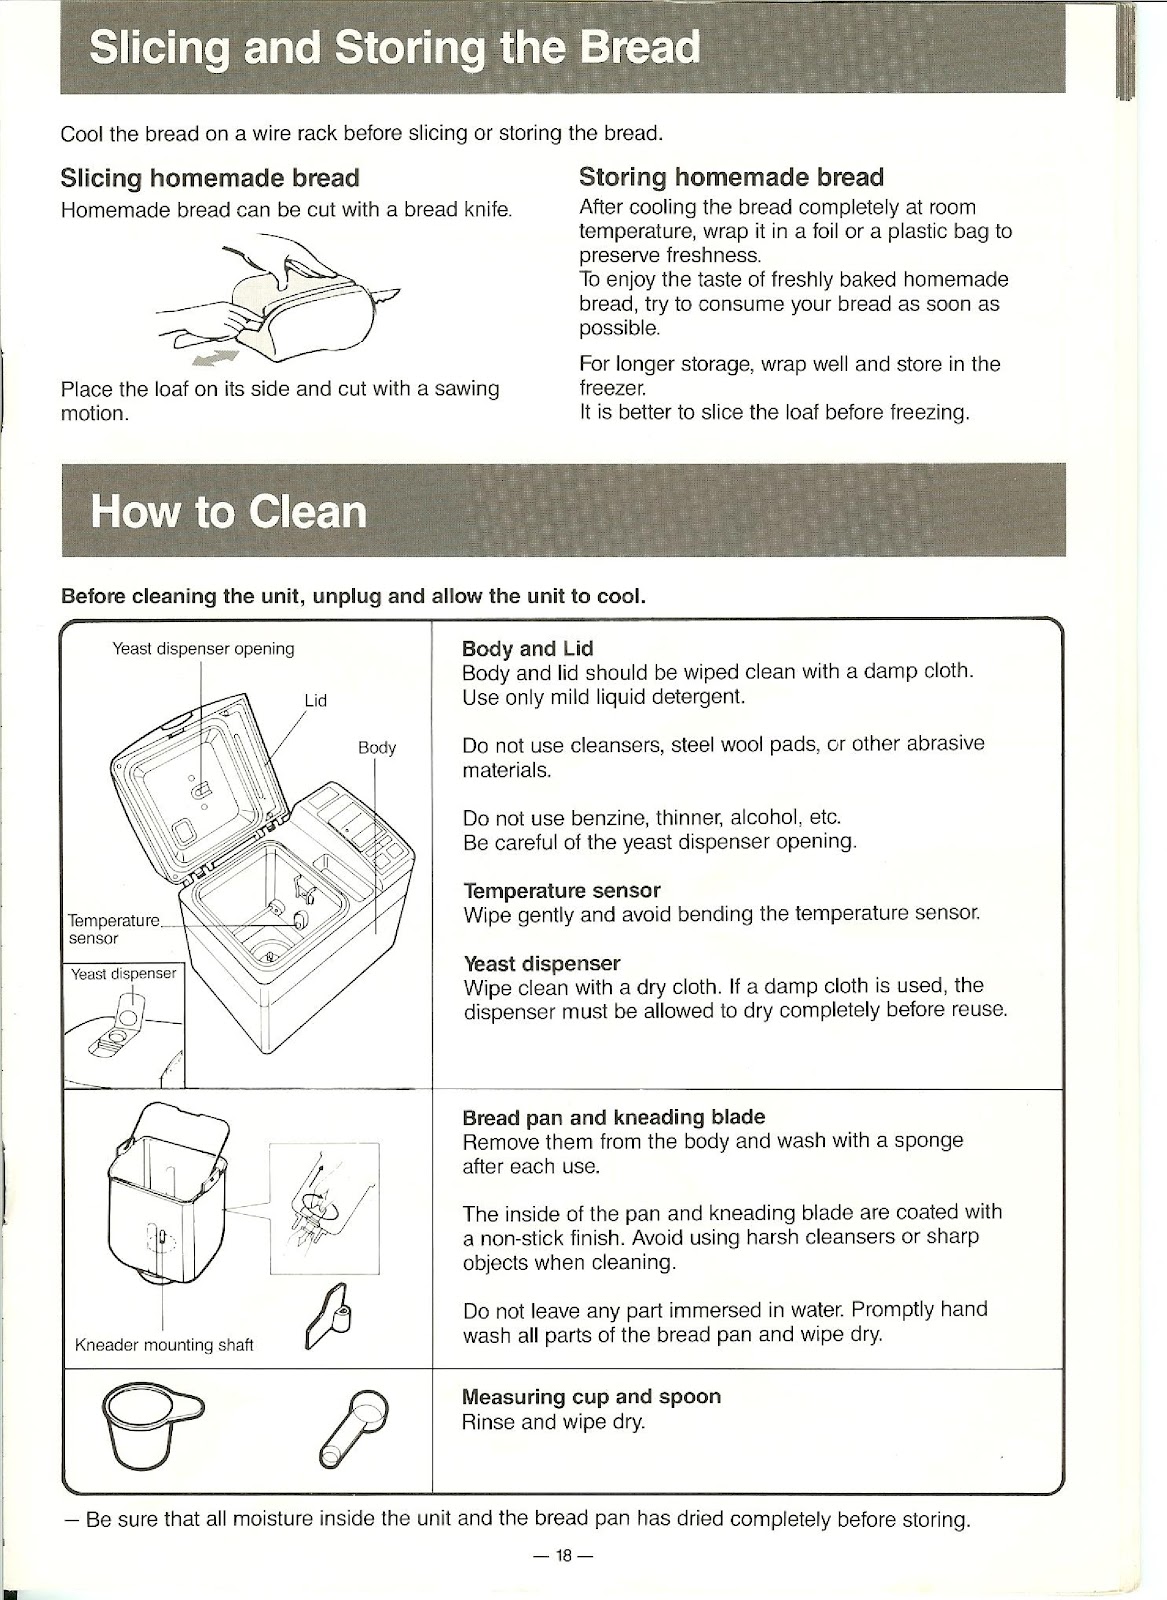
Slicing: Always cool the bread completely on a wire rack before slicing. Use a bread knife. Place the loaf on its side and cut with a sawing motion.
Storing: After the bread has cooled completely to room temperature, wrap it in foil or a plastic bag to preserve freshness. Try to consume your bread as soon as possible. For longer storage, wrap the bread well and store it in the freezer. It is better to slice the loaf before freezing.
How do I clean the PANASONIC SD-BT55P bread maker?
Before cleaning, always unplug the unit and allow it to cool completely.
Body and Lid: Wipe clean with a damp cloth. Use only mild liquid detergent. Do not use cleansers, steel wool pads, or other abrasive materials. Be careful of the yeast dispenser opening.
Temperature Sensor: Wipe the sensor inside the oven area gently and avoid bending it.
Yeast Dispenser: Wipe clean with a dry cloth. If a damp cloth is used, the dispenser must be allowed to dry completely before reuse.
Bread Pan and Kneading Blade: Remove them from the body and wash with a sponge after each use. The inside is coated with a non-stick finish, so avoid harsh cleansers or sharp objects. Do not immerse any part in water. Promptly hand wash and wipe dry.
Measuring Cup and Spoon: Rinse and wipe dry.
Ensure all moisture inside the unit and the bread pan has dried completely before storing.
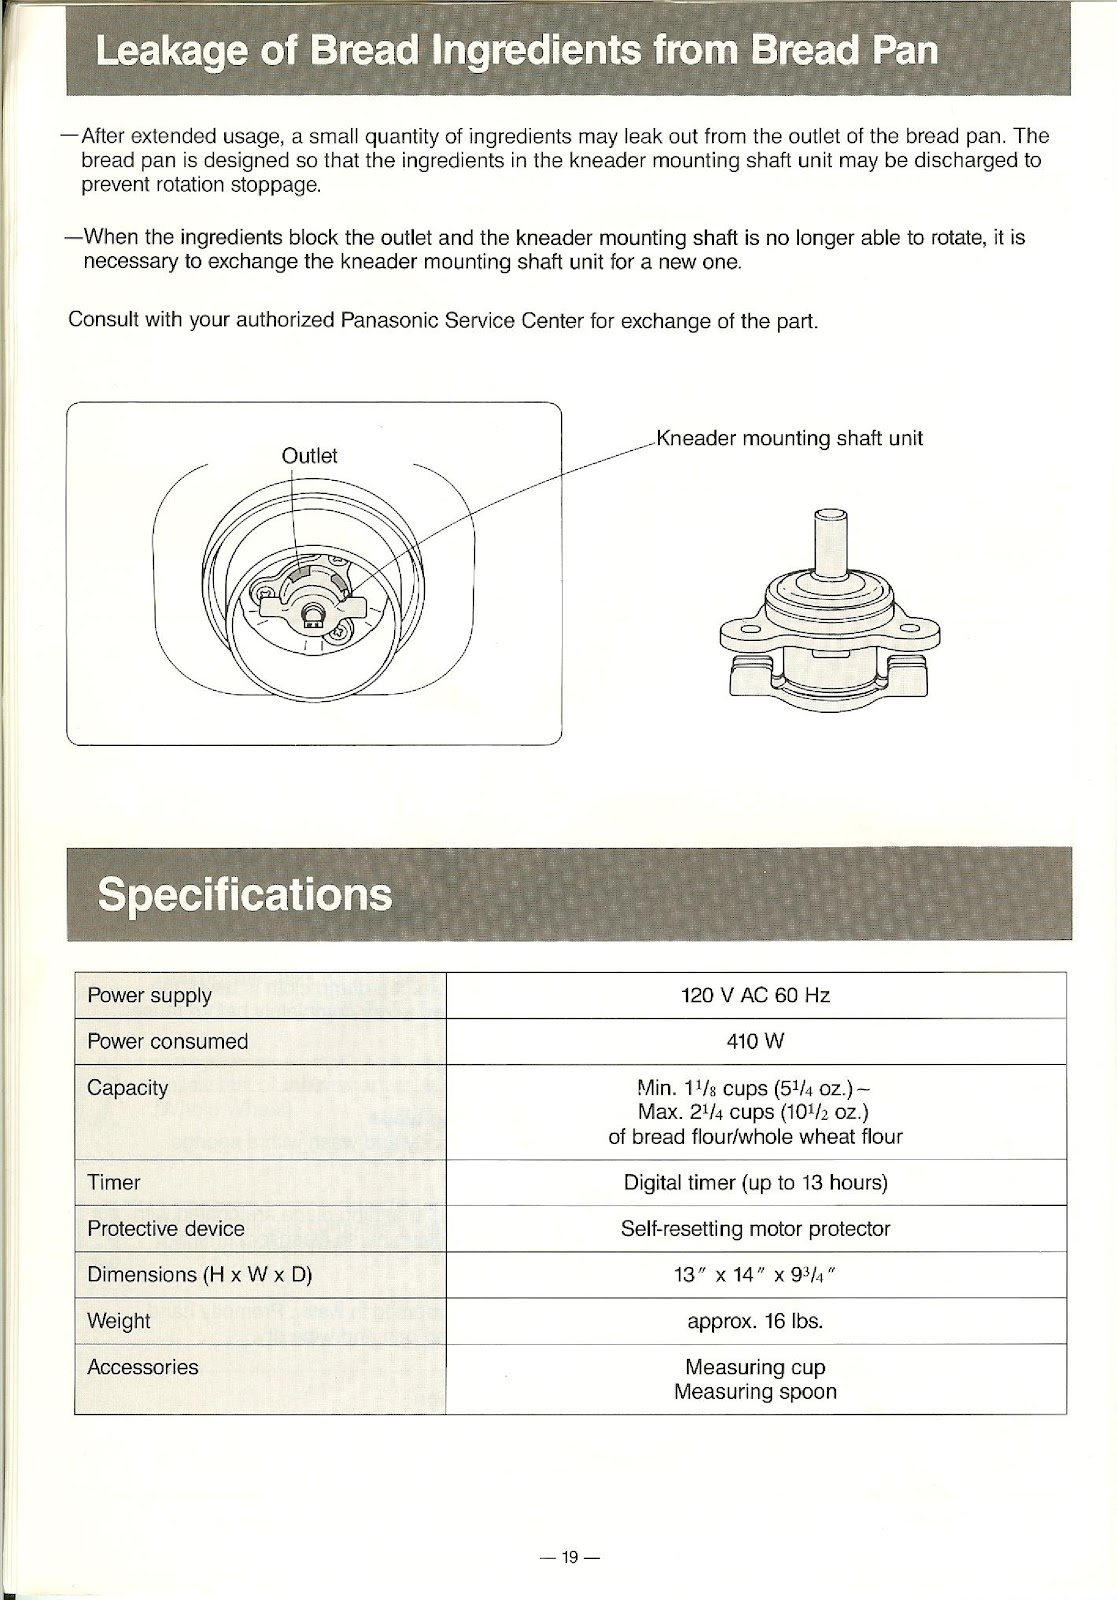
What should I do if ingredients leak from the bread pan of my PANASONIC SD-BT55P?
After extended usage, a small quantity of ingredients may leak out from the outlet of the bread pan. This is by design to prevent rotation stoppage. However, if the ingredients block the outlet and the kneader mounting shaft is no longer able to rotate, it is necessary to exchange the kneader mounting shaft unit for a new one. Consult with your authorized Panasonic Service Center for exchange of the part.
What are the specifications of the PANASONIC SD-BT55P?
| Power supply | 120 V AC 60 Hz |
| Power consumed | 410 W |
| Capacity | Min. 1 1/8 cups (5 1/4 oz.) ~ Max. 2 1/4 cups (10 1/2 oz.) of bread flour/whole wheat flour |
| Timer | Digital timer (up to 13 hours) |
| Protective device | Self-resetting motor protector |
| Dimensions (H x W x D) | 13″ x 14″ x 9 3/4″ |
| Weight | approx. 16 lbs. |
| Accessories | Measuring cup, Measuring spoon |
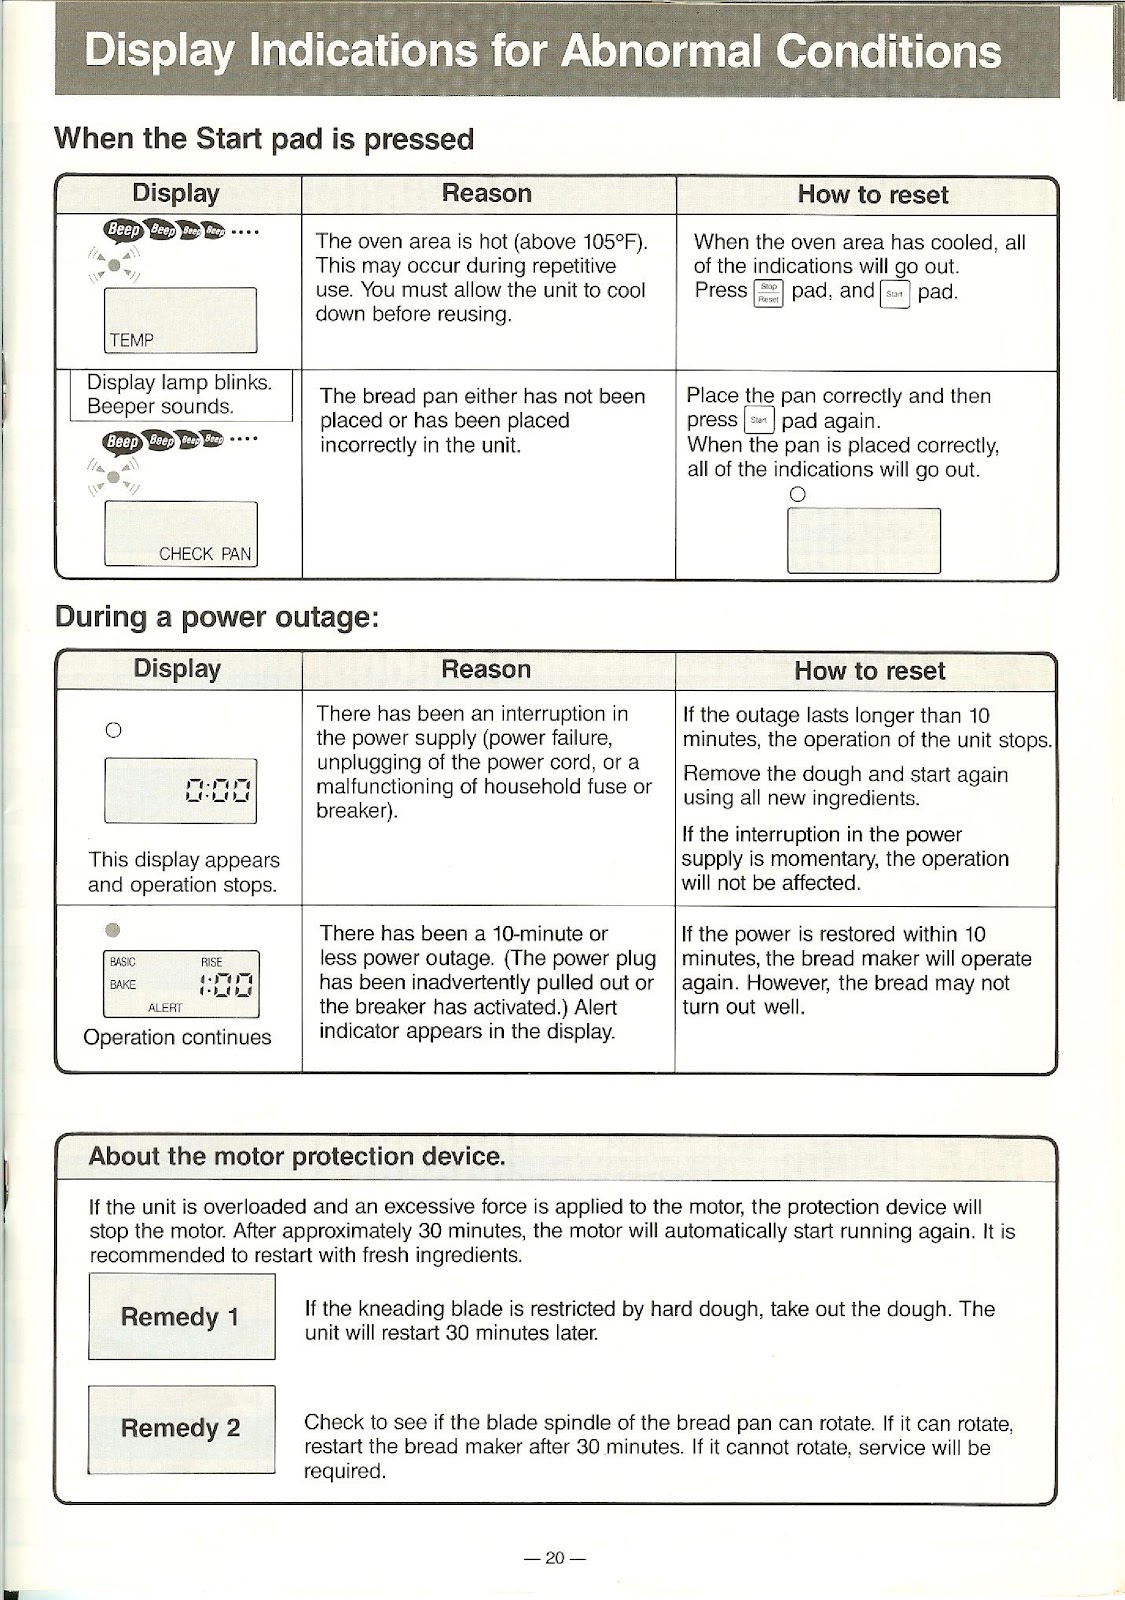
What do the abnormal display indications and alerts mean on the PANASONIC SD-BT55P?
If the indicating lamp blinks and the beeper sounds when you press the Start pad, check the display:
| Display / Condition | Reason | How to Reset |
|---|---|---|
| TEMP is displayed. Beeper sounds. | The oven area is hot (above 105°F). This may occur during repetitive use. | Allow the unit to cool down. When the oven area has cooled, all indications will go out. Press the Stop/Reset pad, then the Start pad. |
| CHECK PAN is displayed. Beeper sounds. | The bread pan has not been placed or has been placed incorrectly in the unit. | Place the pan correctly in the unit and then press the Start pad again. When the pan is placed correctly, the indication will go out. |
During a power outage:
| Display / Condition | Reason | How to Reset |
|---|---|---|
| 0:00 appears and operation stops. | There has been a power interruption longer than 10 minutes (power failure, unplugging, etc.). | The operation stops. Remove the dough and start again using all new ingredients. |
| ALERT appears in the display, but operation continues. | There has been a power outage of 10 minutes or less. | If power is restored within 10 minutes, the bread maker will operate again. However, the bread may not turn out well. |
What does the motor protection device on the PANASONIC SD-BT55P do?
If the unit is overloaded and an excessive force is applied to the motor, the protection device will stop the motor. After approximately 30 minutes, the motor will automatically start running again. It is recommended to restart the process with fresh ingredients.
Remedy 1: If the kneading blade is restricted by hard dough, take out the dough. The unit will restart 30 minutes later.
Remedy 2: Check to see if the blade spindle of the bread pan can rotate. If it can, restart the bread maker after 30 minutes. If it cannot rotate, service will be required.
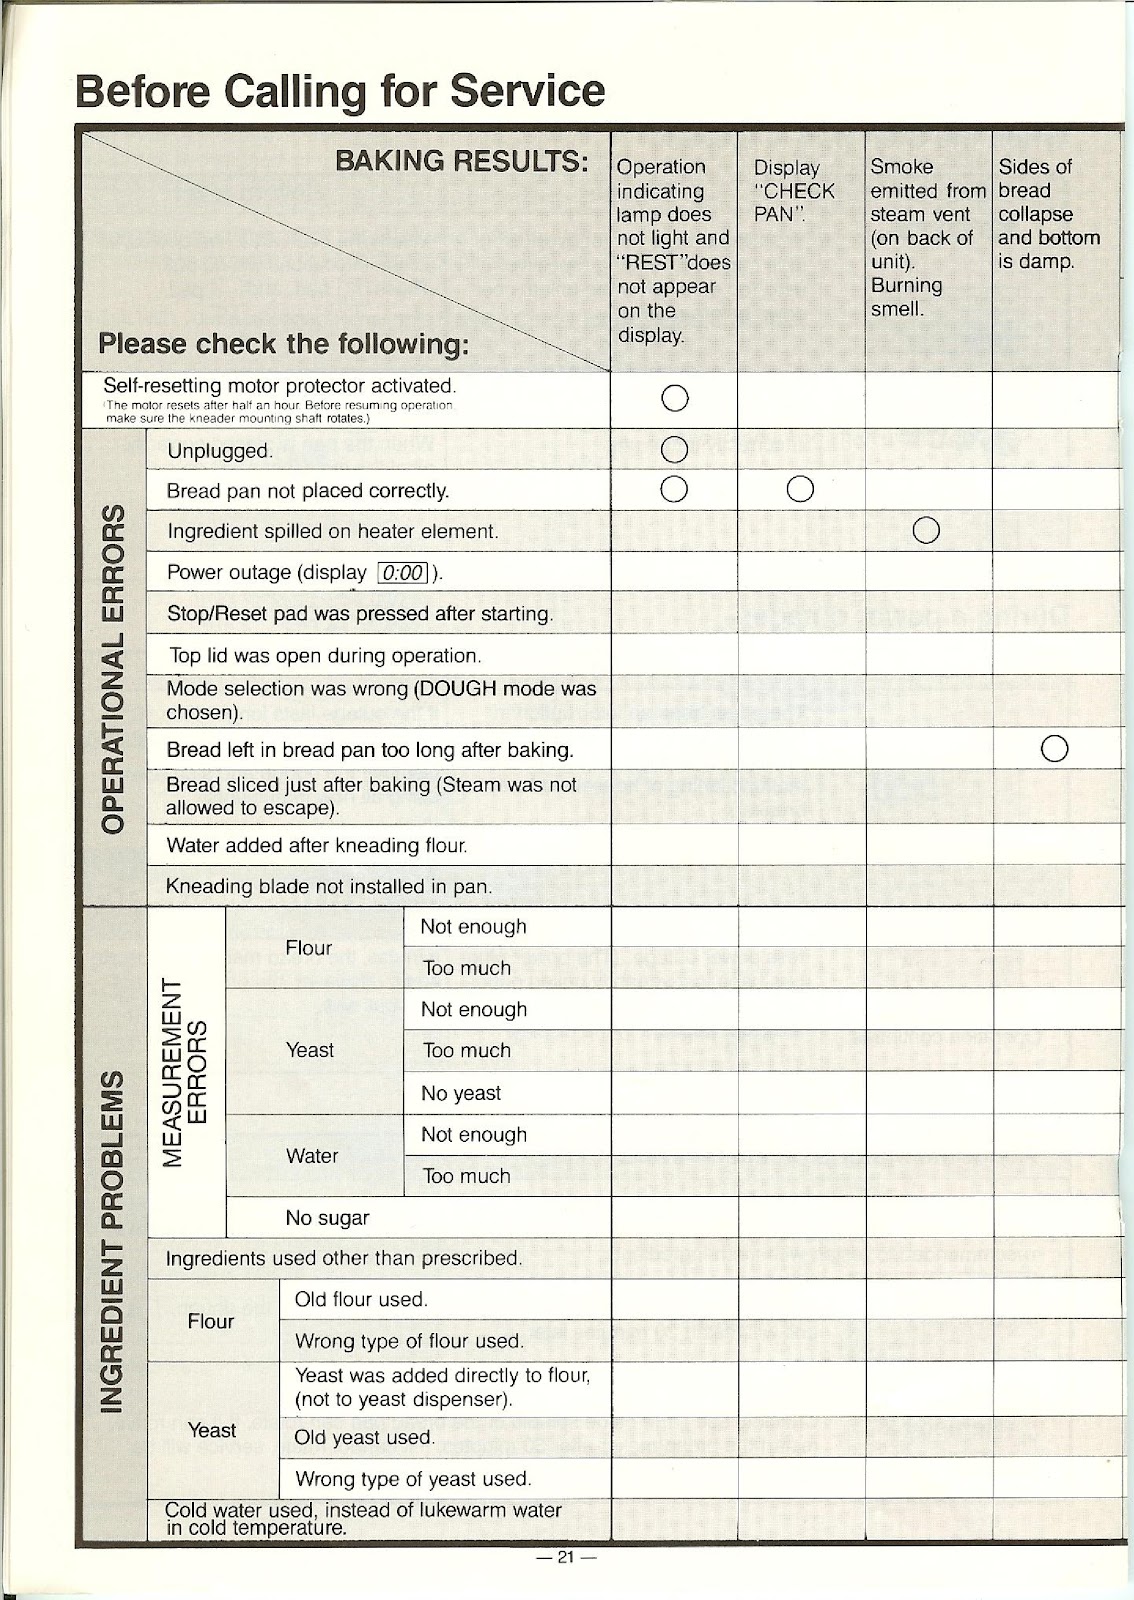
Why isn’t my PANASONIC SD-BT55P starting?
If the operation indicating lamp does not light and “REST” does not appear on the display, check the following:
Unplugged: Ensure the unit is plugged in correctly.
Bread Pan Not Placed Correctly: The unit will not start if the pan is not seated properly. Remove and re-insert it until it clicks.
Power Outage: A power outage may have occurred, resetting the unit. The display will show “0:00”.
Stop/Reset Pad Pressed: The cycle may have been canceled accidentally.
Self-Resetting Motor Protector Activated: If the motor was overloaded, it will stop for about 30 minutes before it can be restarted.
Why did my bread collapse or why are the sides and bottom damp?
If the sides of your bread collapse and the bottom is damp, it may be because the bread was left in the bread pan for too long after baking, causing steam to condense. Another reason could be that the bread was sliced just after baking before the steam was allowed to escape and the structure could set.
Why is my bread from the PANASONIC SD-BT55P not rising enough or unleavened?
Several factors can cause bread to be dense or not rise properly:
Measurement Errors:
• Not enough yeast.
• Too much salt.
• Not enough liquid.
• Not enough sugar (yeast food).
Yeast Issues:
• No yeast was added.
• Old or inactive yeast was used.
• The wrong type of yeast was used (e.g., yeast that needs pre-activation).
• Yeast was added directly to the flour instead of into the yeast dispenser.
Other Issues:
• The Stop/Reset pad was pressed after starting.
• The top lid was opened during the rising or baking process.
• A power outage occurred for more than 10 minutes.
• The wrong type of flour was used.
• Cold water was used in a cold room temperature environment.
Why did my bread rise too much?
If your bread rises too much and collapses, it is likely due to a measurement error. The most common causes are using too much yeast or not enough salt. Salt helps control the yeast’s activity, so too little salt can allow the yeast to over-activate.
Why is the crust of my bread from the Dough cycle too dark, pale, or thick?
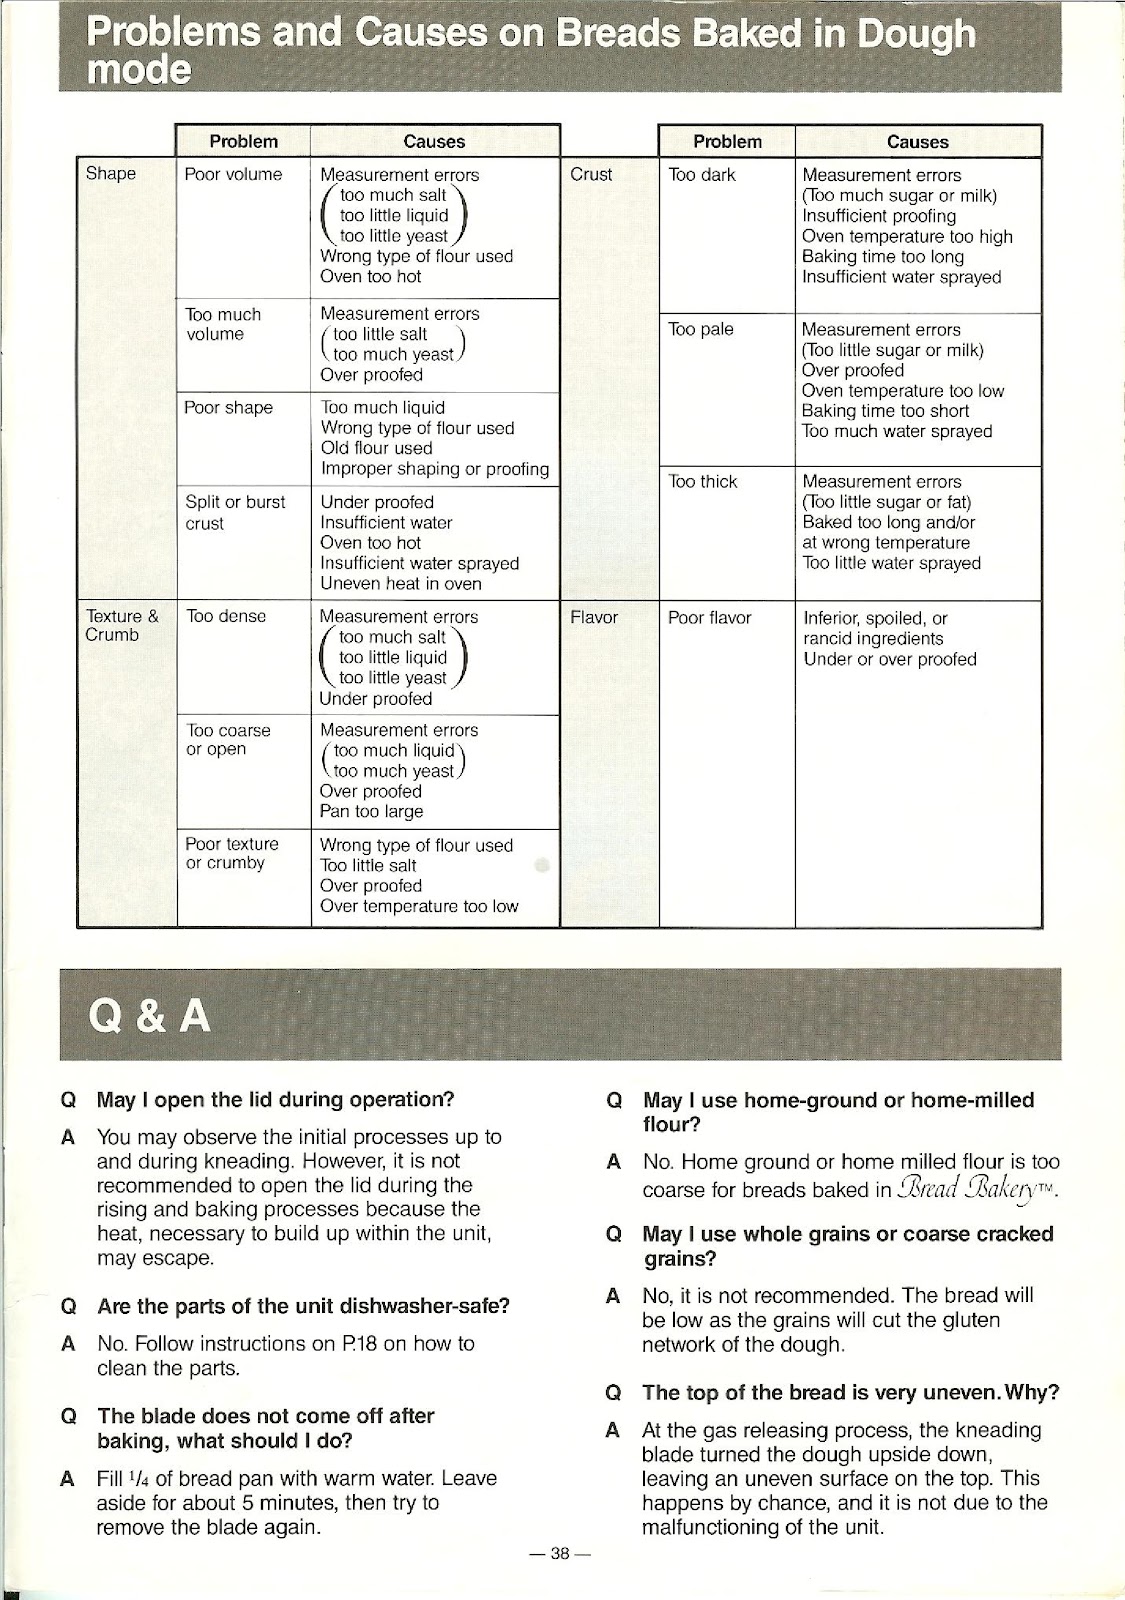
Crust issues for breads made with the Dough cycle and baked in a conventional oven are typically due to these factors:
Too Dark:
• Measurement error (too much sugar or milk).
• Insufficient proofing time.
• Oven temperature is too high.
• Baking time is too long.
Too Pale:
• Measurement error (too little sugar or milk).
• Over-proofed.
• Oven temperature is too low.
• Baking time is too short.
Too Thick:
• Measurement error (too little sugar or fat).
• Baked too long and/or at the wrong temperature.
• Too little water sprayed on the crust before baking.
Why is the texture of my bread from the Dough cycle dense, coarse, or crumby?
Texture problems in bread from the Dough cycle can be caused by:
Too Dense:
• Measurement errors (too much salt, too little liquid, or too little yeast).
• Under-proofed.
Too Coarse or Open:
• Measurement errors (too much liquid or too much yeast).
• Over-proofed.
• Pan is too large for the dough volume.
Poor Texture or Crumby:
• Wrong type of flour used.
• Too little salt.
• Over-proofed.
• Oven temperature is too low.
May I open the lid of the PANASONIC SD-BT55P during operation?
You may observe the initial processes up to and during kneading. However, it is not recommended to open the lid during the rising and baking processes because the heat, necessary to build up within the unit, may escape.
Are the parts of the PANASONIC SD-BT55P dishwasher-safe?
No. Follow the instructions on how to clean the parts manually. Do not place any parts in the dishwasher.
What should I do if the kneading blade does not come off after baking in my PANASONIC SD-BT55P?
Fill 1/4 of the bread pan with warm water. Leave it aside for about 5 minutes, then try to remove the blade again.
Can I use home-ground or home-milled flour in the PANASONIC SD-BT55P?
No. Home-ground or home-milled flour is too coarse for breads baked in the PANASONIC SD-BT55P Bread Bakery.
Can I use whole grains or coarse cracked grains in the PANASONIC SD-BT55P?
No, it is not recommended. The bread will be low as the grains will cut the gluten network of the dough.
Why is the top of my bread from the PANASONIC SD-BT55P very uneven?
At the gas releasing process, the kneading blade turned the dough upside down, leaving an uneven surface on the top. This happens by chance and is not due to a malfunction of the unit.
How to use the PDF below:
* Touchscreen: Swipe up/down with-in the PDF to scroll and pinch or spread with two fingers to zoom.
* Mouse: While your mouse is hovering over the PDF, use the mouse wheel to scroll and click on the – / + buttons at the bottom of the PDF to zoom.


CLICK HERE TO DOWNLOAD PANASONIC SD-BT55P (01) PDF DOCUMENT
Is Panasonic bread maker, SD-BT55P a one lb. loaf or two lb loaf
I have the same question.
That is the model of my breadmaker. Panasonic SD BT55P
Do you have any tips?
Is there a recipe or setting to make gluten free bread?
Good grief, no. This is a classic BREAD-baking machine.
Most bread has gluten, Keto bread, has Vital Wheat Gluten.